市面上存在比较有名的安全框架:Shiro,SpringSecurity
认证和授权
目前,我们的测试环境,是谁都可以访问的,我们使用 Spring Security 增加上认证和授权的功能
1、引入 Spring Security 模块
1
2
3
4
| <dependency>
<groupId>org.springframework.boot</groupId>
<artifactId>spring-boot-starter-security</artifactId>
</dependency>
|
2、编写 Spring Security 配置类
参考官网:https://spring.io/projects/spring-security
查看我们自己项目中的版本,找到对应的帮助文档:
https://docs.spring.io/spring-security/site/docs/5.3.0.RELEASE/reference/html5 #servlet-applications 8.16.4
3、编写基础配置类
1
2
3
4
5
6
7
8
9
10
11
12
13
14
| package com.kuang.config;
import org.springframework.security.config.annotation.web.builders.HttpSecurity;
import org.springframework.security.config.annotation.web.configuration.EnableWebSecurity;
import org.springframework.security.config.annotation.web.configuration.WebSecurityConfigurerAdapter;
@EnableWebSecurity
public class SecurityConfig extends WebSecurityConfigurerAdapter {
@Override
protected void configure(HttpSecurity http) throws Exception {
}
}
|
4、定制请求的授权规则
1
2
3
4
5
6
7
8
9
| @Override
protected void configure(HttpSecurity http) throws Exception {
http.authorizeRequests().antMatchers("/").permitAll()
.antMatchers("/level1/**").hasRole("vip1")
.antMatchers("/level2/**").hasRole("vip2")
.antMatchers("/level3/**").hasRole("vip3");
}
|
5、测试一下:发现除了首页都进不去了!因为我们目前没有登录的角色,因为请求需要登录的角色拥有对应的权限才可以!
6、在configure()方法中加入以下配置,开启自动配置的登录功能!
7、测试一下:发现,没有权限的时候,会跳转到登录的页面!
8、查看刚才登录页的注释信息;
我们可以定义认证规则,重写configure(AuthenticationManagerBuilder auth)方法
1
2
3
4
5
6
7
8
9
10
11
12
|
@Override
protected void configure(AuthenticationManagerBuilder auth) throws Exception {
auth.inMemoryAuthentication()
.withUser("kuangshen").password("123456").roles("vip2","vip3")
.and()
.withUser("root").password("123456").roles("vip1","vip2","vip3")
.and()
.withUser("guest").password("123456").roles("vip1","vip2");
}
|
9、测试,我们可以使用这些账号登录进行测试!发现会报错!
There is no PasswordEncoder mapped for the id “null”
10、原因,我们要将前端传过来的密码进行某种方式加密,否则就无法登录,修改代码
1
2
3
4
5
6
7
8
9
10
11
12
13
14
15
|
@Override
protected void configure(AuthenticationManagerBuilder auth) throws Exception {
auth.inMemoryAuthentication().passwordEncoder(new BCryptPasswordEncoder())
.withUser("kuangshen").password(new BCryptPasswordEncoder().encode("123456")).roles("vip2","vip3")
.and()
.withUser("root").password(new BCryptPasswordEncoder().encode("123456")).roles("vip1","vip2","vip3")
.and()
.withUser("guest").password(new BCryptPasswordEncoder().encode("123456")).roles("vip1","vip2");
}
|
权限控制和注销
1、开启自动配置的注销的功能
1
2
3
4
5
6
7
8
|
@Override
protected void configure(HttpSecurity http) throws Exception {
http.logout();
}
|
2、我们在前端,增加一个注销的按钮,index.html 导航栏中
1
2
3
| <a class="item" th:href="@{/logout}">
<i class="address card icon"></i> 注销
</a>
|
3、我们可以去测试一下,登录成功后点击注销,发现注销完毕会跳转到登录页面!
4、但是,我们想让他注销成功后,依旧可以跳转到首页,该怎么处理呢?
1
2
|
http.logout().logoutSuccessUrl("/");
|
5、测试,注销完毕后,发现跳转到首页OK
6、我们现在又来一个需求:用户没有登录的时候,导航栏上只显示登录按钮,用户登录之后,导航栏可以显示登录的用户信息及注销按钮!还有就是,比如kuangshen这个用户,它只有 vip2,vip3功能,那么登录则只显示这两个功能,而vip1的功能菜单不显示!这个就是真实的网站情况了!该如何做呢?
我们需要结合thymeleaf中的一些功能
sec:authorize=”isAuthenticated()”:是否认证登录!来显示不同的页面
Maven依赖:
1
2
3
4
5
6
|
<dependency>
<groupId>org.thymeleaf.extras</groupId>
<artifactId>thymeleaf-extras-springsecurity5</artifactId>
<version>3.0.4.RELEASE</version>
</dependency>
|
7、修改我们的 前端页面
导入命名空间
xmlns:sec="http://www.thymeleaf.org/thymeleaf-extras-springsecurity5"
1
2
3
4
5
6
7
8
9
10
11
12
13
14
15
16
17
18
19
20
21
22
23
24
25
26
27
28
29
|
3. 修改导航栏,增加认证判断
4. ```html
<div class="right menu">
<div sec:authorize="!isAuthenticated()">
<a class="item" th:href="@{/login}">
<i class="address card icon"></i> 登录
</a>
</div>
<div sec:authorize="isAuthenticated()">
<a class="item">
<i class="address card icon"></i>
用户名:<span sec:authentication="principal.username"></span>
角色:<span sec:authentication="principal.authorities"></span>
</a>
</div>
<div sec:authorize="isAuthenticated()">
<a class="item" th:href="@{/logout}">
<i class="address card icon"></i> 注销
</a>
</div>
</div>
|
8、重启测试,我们可以登录试试看,登录成功后确实,显示了我们想要的页面;
9、如果注销404了,就是因为它默认防止csrf跨站请求伪造,因为会产生安全问题,我们可以将请求改为post表单提交,或者在spring security中关闭csrf功能;我们试试:在 配置中增加 http.csrf().disable();
1
2
| http.csrf().disable();
http.logout().logoutSuccessUrl("/");
|
10、我们继续将下面的角色功能块认证完成!
1
2
3
4
5
6
7
8
9
10
11
12
13
14
15
16
17
18
19
20
21
22
23
24
25
26
27
28
29
30
31
32
33
34
35
36
37
38
39
40
41
42
|
<div class="column" sec:authorize="hasRole('vip1')">
<div class="ui raised segment">
<div class="ui">
<div class="content">
<h5 class="content">Level 1</h5>
<hr>
<div><a th:href="@{/level1/1}"><i class="bullhorn icon"></i> Level-1-1</a></div>
<div><a th:href="@{/level1/2}"><i class="bullhorn icon"></i> Level-1-2</a></div>
<div><a th:href="@{/level1/3}"><i class="bullhorn icon"></i> Level-1-3</a></div>
</div>
</div>
</div>
</div>
<div class="column" sec:authorize="hasRole('vip2')">
<div class="ui raised segment">
<div class="ui">
<div class="content">
<h5 class="content">Level 2</h5>
<hr>
<div><a th:href="@{/level2/1}"><i class="bullhorn icon"></i> Level-2-1</a></div>
<div><a th:href="@{/level2/2}"><i class="bullhorn icon"></i> Level-2-2</a></div>
<div><a th:href="@{/level2/3}"><i class="bullhorn icon"></i> Level-2-3</a></div>
</div>
</div>
</div>
</div>
<div class="column" sec:authorize="hasRole('vip3')">
<div class="ui raised segment">
<div class="ui">
<div class="content">
<h5 class="content">Level 3</h5>
<hr>
<div><a th:href="@{/level3/1}"><i class="bullhorn icon"></i> Level-3-1</a></div>
<div><a th:href="@{/level3/2}"><i class="bullhorn icon"></i> Level-3-2</a></div>
<div><a th:href="@{/level3/3}"><i class="bullhorn icon"></i> Level-3-3</a></div>
</div>
</div>
</div>
</div>
|
11、测试一下!
12、权限控制和注销搞定!
记住我
现在的情况,我们只要登录之后,关闭浏览器,再登录,就会让我们重新登录,但是很多网站的情况,就是有一个记住密码的功能,这个该如何实现呢?很简单
1、开启记住我功能
1
2
3
4
5
6
7
|
@Override
protected void configure(HttpSecurity http) throws Exception {
http.rememberMe();
}
|
2、我们再次启动项目测试一下,发现登录页多了一个记住我功能,我们登录之后关闭 浏览器,然后重新打开浏览器访问,发现用户依旧存在!
思考:如何实现的呢?其实非常简单
我们可以查看浏览器的cookie
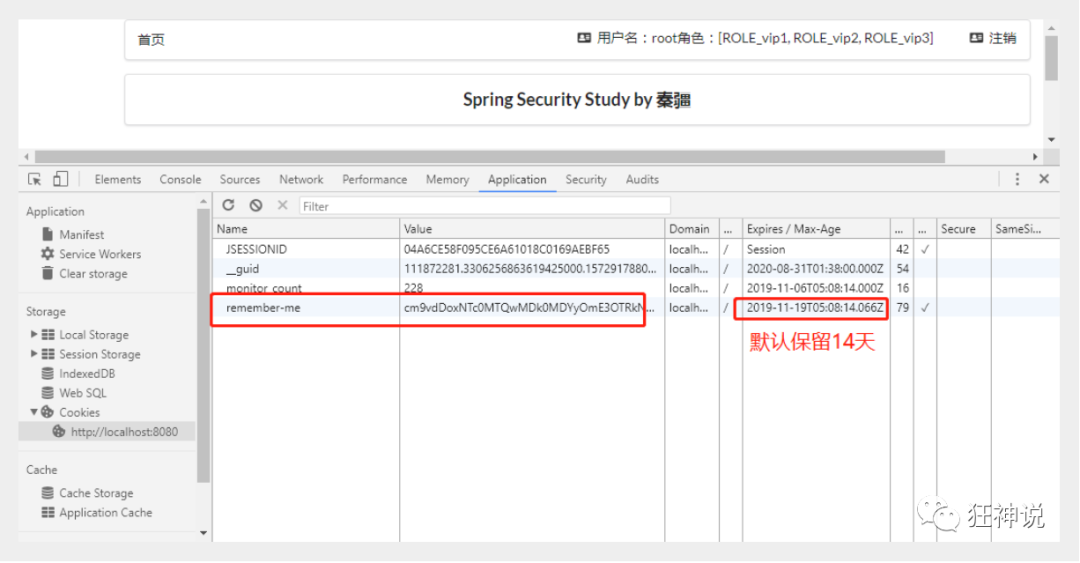
3、我们点击注销的时候,可以发现,spring security 帮我们自动删除了这个 cookie
4、结论:登录成功后,将cookie发送给浏览器保存,以后登录带上这个cookie,只要通过检查就可以免登录了。如果点击注销,则会删除这个cookie
定制登录页
现在这个登录页面都是spring security 默认的,怎么样可以使用我们自己写的Login界面呢?
1、在刚才的登录页配置后面指定 loginpage
1
| http.formLogin().loginPage("/toLogin");
|
2、然后前端也需要指向我们自己定义的 login请求
1
2
3
| <a class="item" th:href="@{/toLogin}">
<i class="address card icon"></i> 登录
</a>
|
3、我们登录,需要将这些信息发送到哪里,我们也需要配置,login.html 配置提交请求及方式,方式必须为post:
在 loginPage()源码中的注释上有写明:
1
2
3
4
5
6
7
8
9
10
11
12
13
14
15
16
17
| <form th:action="@{/login}" method="post">
<div class="field">
<label>Username</label>
<div class="ui left icon input">
<input type="text" placeholder="Username" name="username">
<i class="user icon"></i>
</div>
</div>
<div class="field">
<label>Password</label>
<div class="ui left icon input">
<input type="password" name="password">
<i class="lock icon"></i>
</div>
</div>
<input type="submit" class="ui blue submit button"/>
</form>
|
4、这个请求提交上来,我们还需要验证处理,怎么做呢?我们可以查看formLogin()方法的源码!我们配置接收登录的用户名和密码的参数!
1
2
3
4
5
| http.formLogin()
.usernameParameter("username")
.passwordParameter("password")
.loginPage("/toLogin")
.loginProcessingUrl("/login");
|
5、在登录页增加记住我的多选框
1
| <input type="checkbox" name="remember"> 记住我
|
6、后端验证处理!
1
2
|
http.rememberMe().rememberMeParameter("remember");
|
7、测试,OK
完整配置代码
1
2
3
4
5
6
7
8
9
10
11
12
13
14
15
16
17
18
19
20
21
22
23
24
25
26
27
28
29
30
31
32
33
34
35
36
37
38
39
40
41
42
43
44
45
46
47
48
49
50
51
52
53
54
55
56
57
| package com.kuang.config;
import org.springframework.security.config.annotation.authentication.builders.AuthenticationManagerBuilder;
import org.springframework.security.config.annotation.web.builders.HttpSecurity;
import org.springframework.security.config.annotation.web.configuration.EnableWebSecurity;
import org.springframework.security.config.annotation.web.configuration.WebSecurityConfigurerAdapter;
import org.springframework.security.crypto.bcrypt.BCryptPasswordEncoder;
@EnableWebSecurity
public class SecurityConfig extends WebSecurityConfigurerAdapter {
@Override
protected void configure(HttpSecurity http) throws Exception {
http.authorizeRequests().antMatchers("/").permitAll()
.antMatchers("/level1/**").hasRole("vip1")
.antMatchers("/level2/**").hasRole("vip2")
.antMatchers("/level3/**").hasRole("vip3");
http.formLogin()
.usernameParameter("username")
.passwordParameter("password")
.loginPage("/toLogin")
.loginProcessingUrl("/login");
http.csrf().disable();
http.logout().logoutSuccessUrl("/");
http.rememberMe().rememberMeParameter("remember");
}
@Override
protected void configure(AuthenticationManagerBuilder auth) throws Exception {
auth.inMemoryAuthentication().passwordEncoder(new BCryptPasswordEncoder())
.withUser("kuangshen").password(new BCryptPasswordEncoder().encode("123456")).roles("vip2","vip3")
.and()
.withUser("root").password(new BCryptPasswordEncoder().encode("123456")).roles("vip1","vip2","vip3")
.and()
.withUser("guest").password(new BCryptPasswordEncoder().encode("123456")).roles("vip1","vip2");
}
}
|