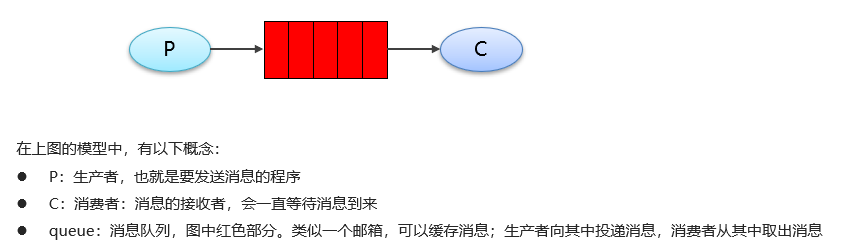
RabbitMQ简介
RabbitMQ是由erlang语言开发,基于AMQP(Advanced Message Queue 高级消息队列协议)协议实现的消息队列,它是一种应用程序之间的通信方法,消息队列在分布式系统开发中应用非常广泛。
RabbitMQ官方地址:http://www.rabbitmq.com/
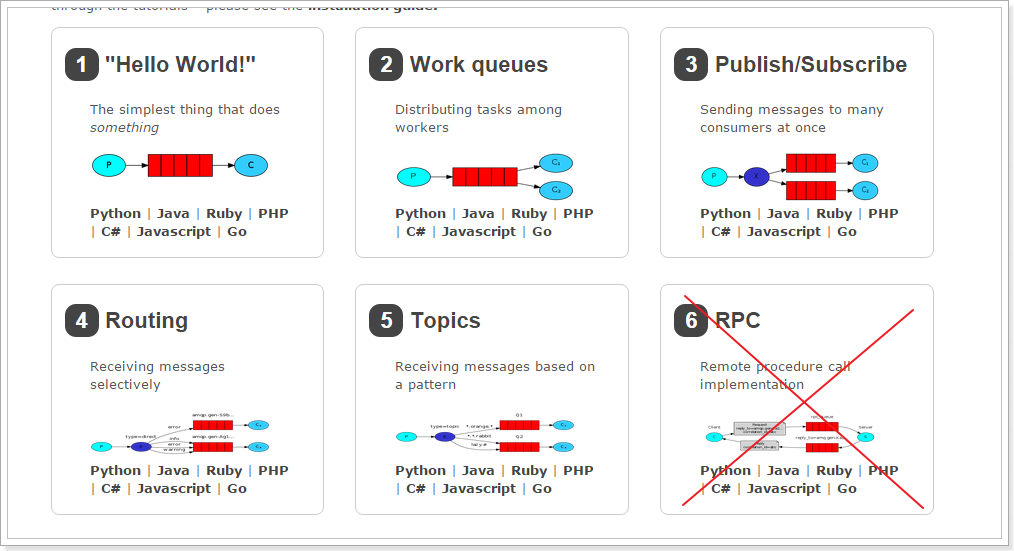
RabbitMQ提供了6种模式:
- 简单模式
- work模式
- Publish/Subscribe发布与订阅模式
- Routing路由模式
- Topics主题模式
- RPC远程调用模式(远程调用,不太算MQ;暂不作介绍);
官网对应模式介绍:https://www.rabbitmq.com/getstarted.html
启动rabbitmq
1
2
3
4
5
| systemctl enable rabbitmq-server
systemctl start rabbitmq-server
systemctl status rabbitmq-server
|
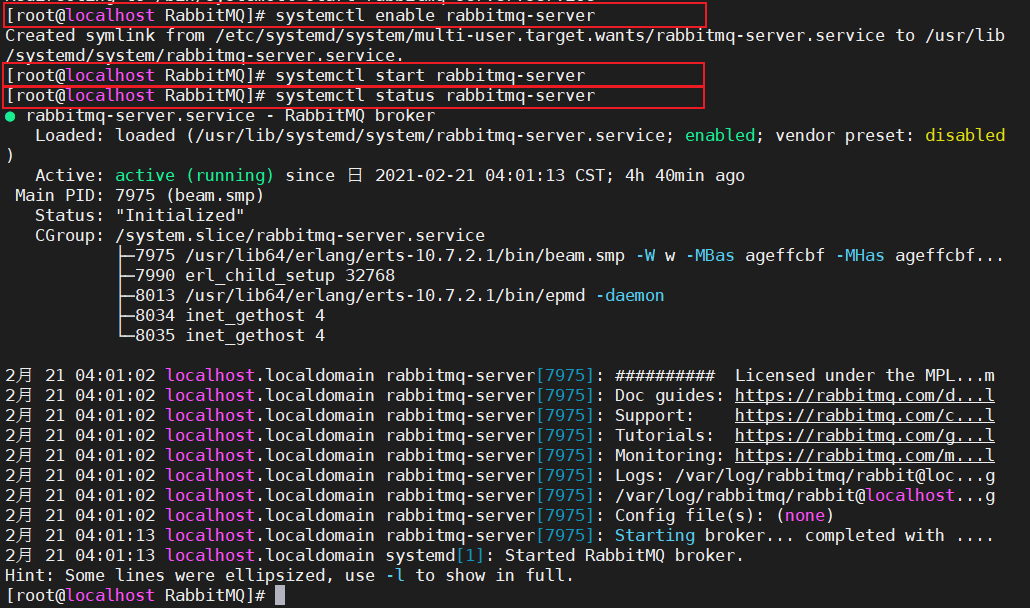
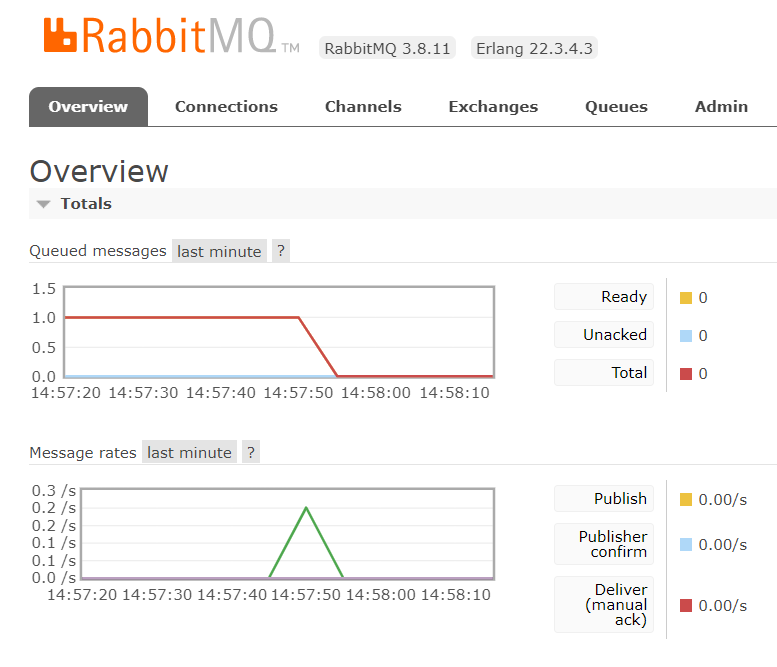
测试:IP:15672
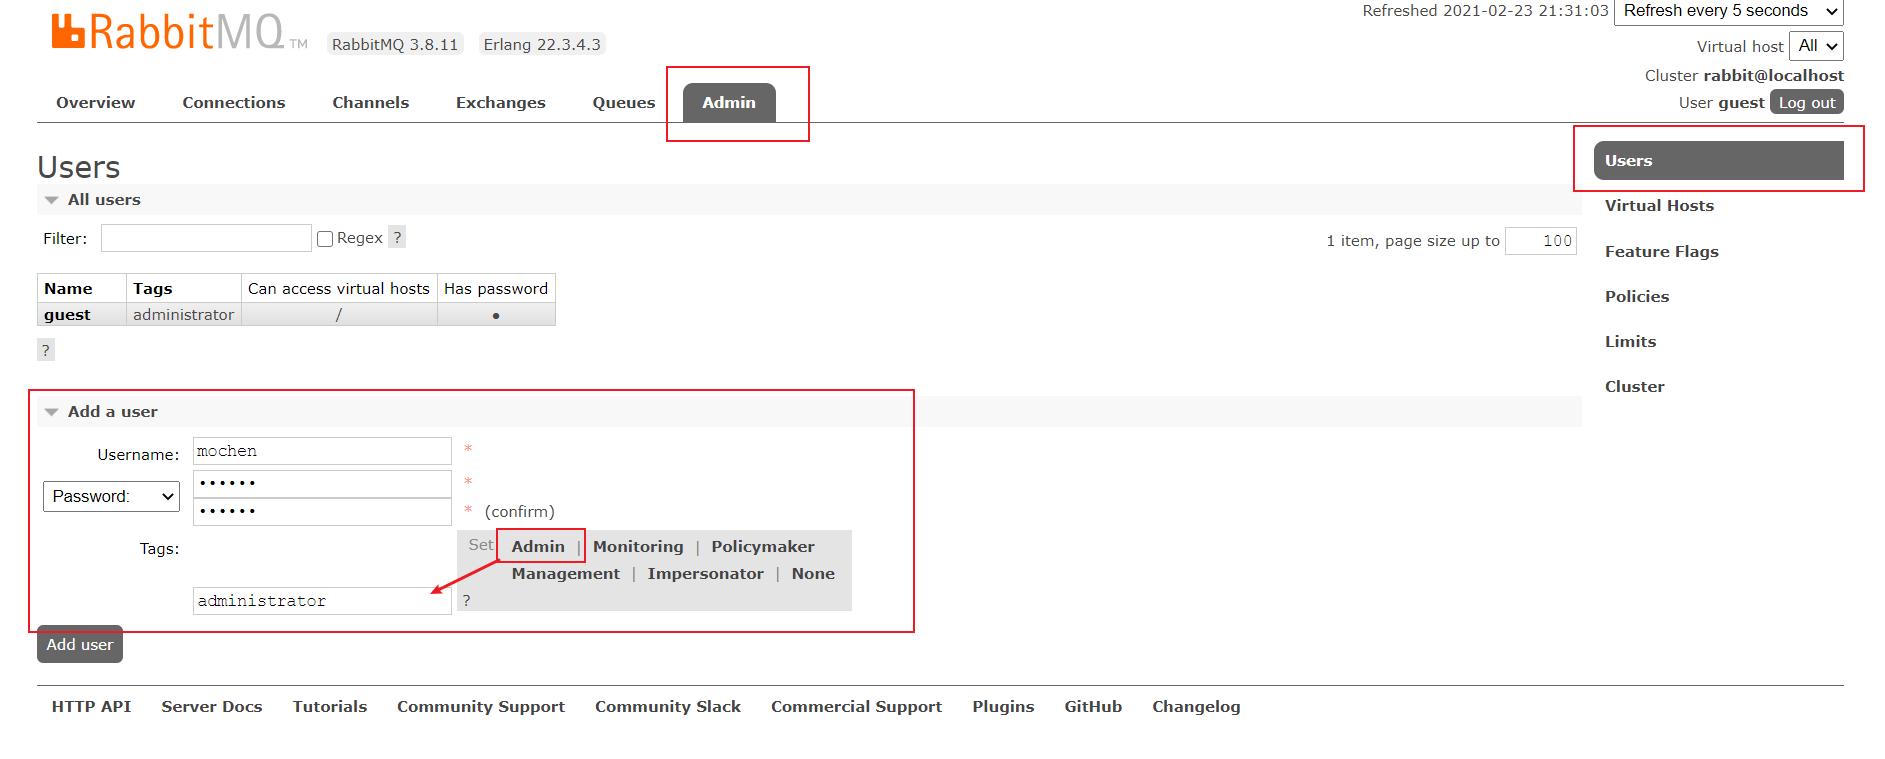
管控台添加用户及虚拟机
添加用户并设置admin权限
添加虚拟机
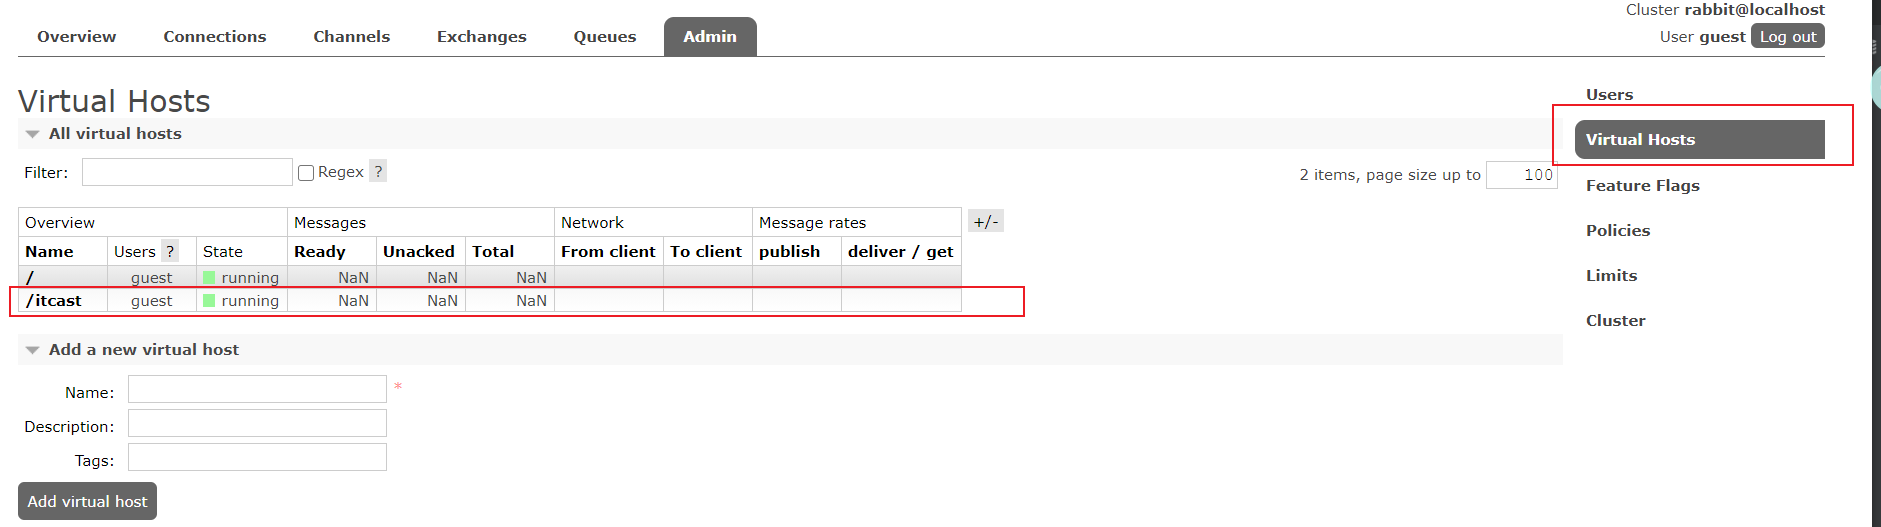
点击此虚拟机,设置用户访问此虚拟机
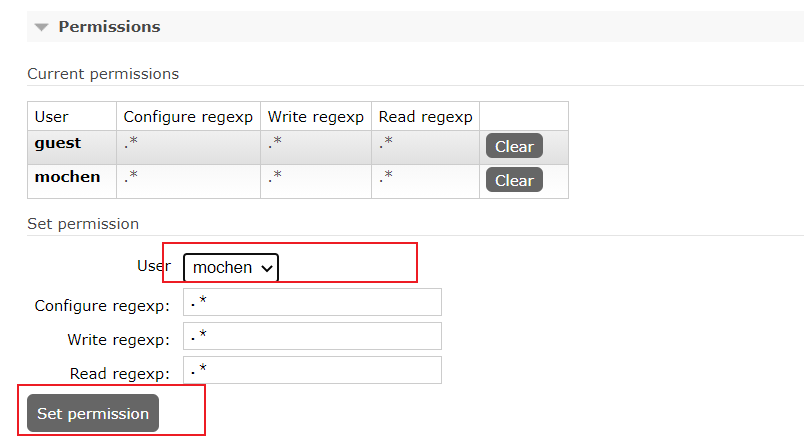
退出重新登陆新设置用户

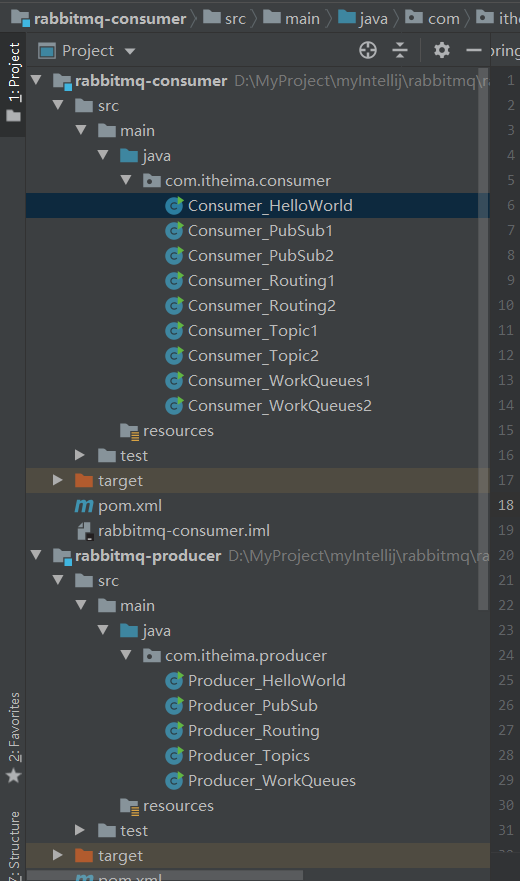
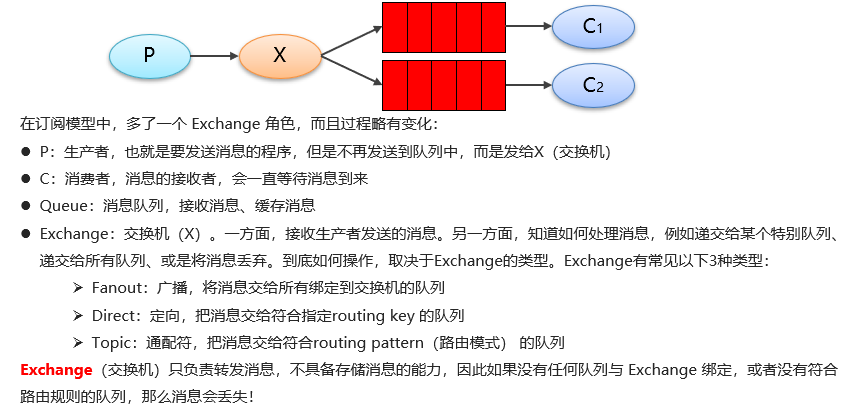
六种工作模式的实现
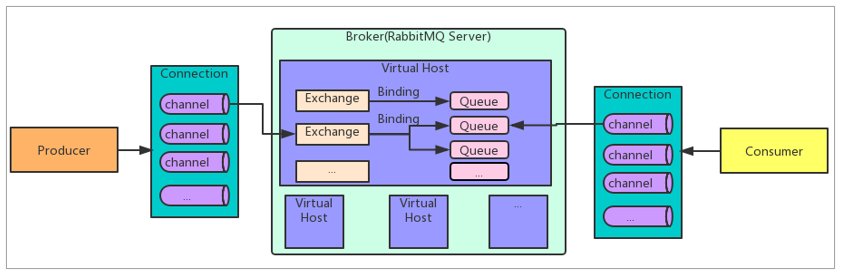
RabbitMQ基础架构图
1
2
3
4
5
6
7
8
9
10
11
12
13
14
15
16
17
18
19
20
21
22
23
| <dependencies>
<dependency>
<groupId>com.rabbitmq</groupId>
<artifactId>amqp-client</artifactId>
<version>5.6.0</version>
</dependency>
</dependencies>
<build>
<plugins>
<plugin>
<groupId>org.apache.maven.plugins</groupId>
<artifactId>maven-compiler-plugin</artifactId>
<version>3.8.0</version>
<configuration>
<source>1.8</source>
<target>1.8</target>
</configuration>
</plugin>
</plugins>
</build>
|
在所有pom中都要加入上述依赖
简单模式
producer_Helloworld.java
1
2
3
4
5
6
7
8
9
10
11
12
13
14
15
16
17
18
19
20
21
22
23
24
25
26
27
28
29
30
31
32
33
34
35
36
37
38
39
40
41
42
43
44
45
46
47
48
49
50
51
52
53
54
55
56
57
58
59
60
61
62
63
64
65
66
| package com.itheima.producer;
import com.rabbitmq.client.Channel;
import com.rabbitmq.client.Connection;
import com.rabbitmq.client.ConnectionFactory;
import java.io.IOException;
import java.util.concurrent.TimeoutException;
public class Producer_HelloWorld {
public static void main(String[] args) throws IOException, TimeoutException {
ConnectionFactory factory = new ConnectionFactory();
factory.setHost("192.168.91.130");
factory.setPort(5672);
factory.setVirtualHost("/itcast");
factory.setUsername("mochen");
factory.setPassword("mochen");
Connection connection = factory.newConnection();
Channel channel = connection.createChannel();
channel.queueDeclare("hello_world",true,false,false,null);
String body = "hello rabbitmq~~~";
channel.basicPublish("","hello_world",null,body.getBytes());
channel.close();
connection.close();
}
}
|
运行生产者
Consumer_Helloworld.java
1
2
3
4
5
6
7
8
9
10
11
12
13
14
15
16
17
18
19
20
21
22
23
24
25
26
27
28
29
30
31
32
33
34
35
36
37
38
39
40
41
42
43
44
45
46
47
48
49
50
51
52
53
54
55
56
57
58
59
60
61
62
63
64
65
66
67
68
69
70
71
72
73
74
| package com.itheima.consumer;
import com.rabbitmq.client.*;
import java.io.IOException;
import java.util.concurrent.TimeoutException;
public class Consumer_HelloWorld {
public static void main(String[] args) throws IOException, TimeoutException {
ConnectionFactory factory = new ConnectionFactory();
factory.setHost("192.168.91.130");
factory.setPort(5672);
factory.setVirtualHost("/itcast");
factory.setUsername("mochen");
factory.setPassword("mochen");
Connection connection = factory.newConnection();
Channel channel = connection.createChannel();
channel.queueDeclare("hello_world",true,false,false,null);
Consumer consumer = new DefaultConsumer(channel){
@Override
public void handleDelivery(String consumerTag, Envelope envelope, AMQP.BasicProperties properties, byte[] body) throws IOException {
System.out.println("consumerTag:"+consumerTag);
System.out.println("Exchange:"+envelope.getExchange());
System.out.println("RoutingKey:"+envelope.getRoutingKey());
System.out.println("properties:"+properties);
System.out.println("body:"+new String(body));
}
};
channel.basicConsume("hello_world",true,consumer);
}
}
|
运行消费者
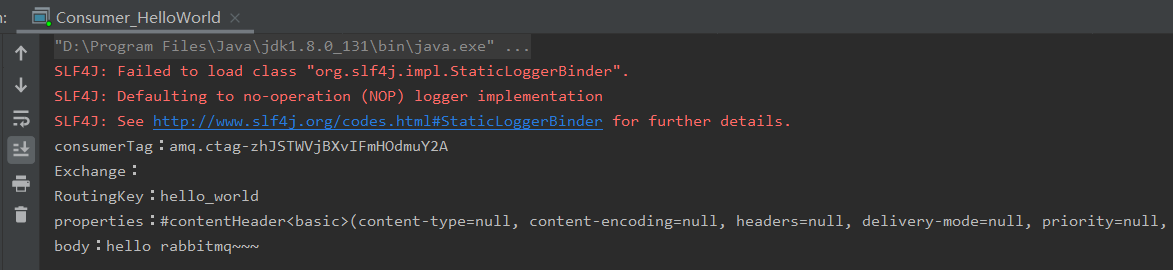
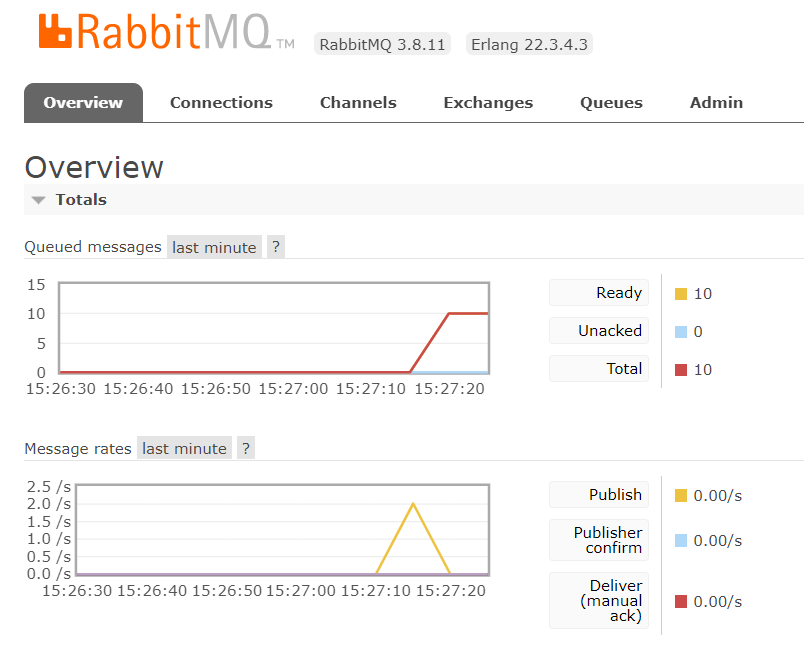
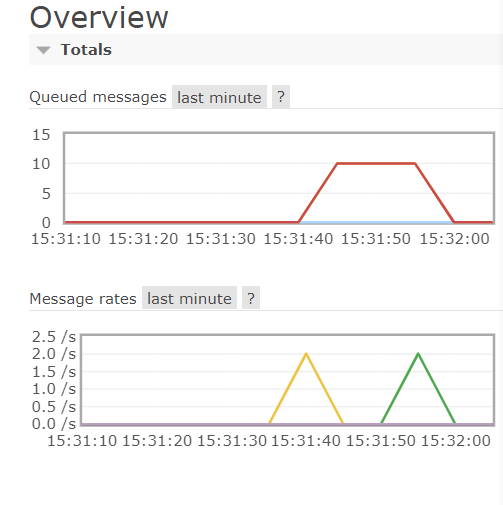
同时可以看见控制台的变化
WorkQueue工作队列模式
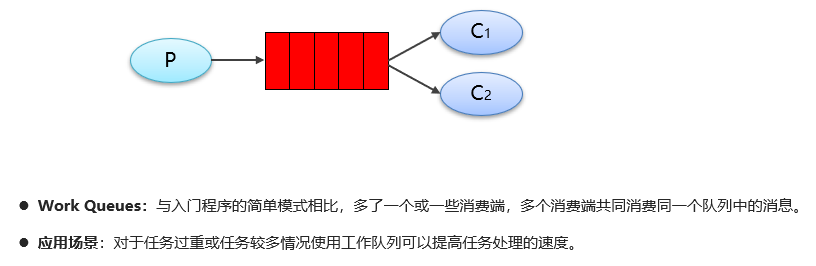
同简单模式代码设置两个一样的消费者即可
Producer_WorkQueues.java
生产者一次性生产多个
1
2
3
4
5
6
7
8
9
10
11
12
13
14
15
16
17
18
19
20
21
22
23
24
25
26
27
28
29
30
31
32
33
34
35
36
37
38
39
40
41
42
43
44
45
46
47
48
49
50
51
52
53
54
55
56
57
58
59
60
61
62
63
64
65
| package com.itheima.producer;
import com.rabbitmq.client.Channel;
import com.rabbitmq.client.Connection;
import com.rabbitmq.client.ConnectionFactory;
import java.io.IOException;
import java.util.concurrent.TimeoutException;
public class Producer_WorkQueues {
public static void main(String[] args) throws IOException, TimeoutException {
ConnectionFactory factory = new ConnectionFactory();
factory.setHost("172.16.98.133");
factory.setPort(5672);
factory.setVirtualHost("/itcast");
factory.setUsername("heima");
factory.setPassword("heima");
Connection connection = factory.newConnection();
Channel channel = connection.createChannel();
channel.queueDeclare("work_queues",true,false,false,null);
for (int i = 1; i <= 10; i++) {
String body = i+"hello rabbitmq~~~";
channel.basicPublish("","work_queues",null,body.getBytes());
}
channel.close();
connection.close();
}
}
|
运行生产者
Consumer_WorkQueues1.java
Consumer_WorkQueues2.java
1
2
3
4
5
6
7
8
9
10
11
12
13
14
15
16
17
18
19
20
21
22
23
24
25
26
27
28
29
30
31
32
33
34
35
36
37
38
39
40
41
42
43
44
45
46
47
48
49
50
51
52
53
54
55
56
57
58
59
60
61
62
63
64
65
66
67
68
69
70
71
72
73
74
75
| package com.itheima.consumer;
import com.rabbitmq.client.*;
import java.io.IOException;
import java.util.concurrent.TimeoutException;
public class Consumer_WorkQueues1 {
public static void main(String[] args) throws IOException, TimeoutException {
ConnectionFactory factory = new ConnectionFactory();
factory.setHost("192.168.91.130");
factory.setPort(5672);
factory.setVirtualHost("/itcast");
factory.setUsername("mochen");
factory.setPassword("mochen");
Connection connection = factory.newConnection();
Channel channel = connection.createChannel();
channel.queueDeclare("work_queues",true,false,false,null);
Consumer consumer = new DefaultConsumer(channel){
@Override
public void handleDelivery(String consumerTag, Envelope envelope, AMQP.BasicProperties properties, byte[] body) throws IOException {
System.out.println("body:"+new String(body));
}
};
channel.basicConsume("work_queues",true,consumer);
}
}
|
同时开启两个消费者,消费者属于竞争关系
Pub/Sub订阅模式
Producer_PubSub.java
1
2
3
4
5
6
7
8
9
10
11
12
13
14
15
16
17
18
19
20
21
22
23
24
25
26
27
28
29
30
31
32
33
34
35
36
37
38
39
40
41
42
43
44
45
46
47
48
49
50
51
52
53
54
55
56
57
58
59
60
61
62
63
64
65
66
67
68
69
70
71
72
73
74
75
76
| package com.itheima.producer;
import com.rabbitmq.client.BuiltinExchangeType;
import com.rabbitmq.client.Channel;
import com.rabbitmq.client.Connection;
import com.rabbitmq.client.ConnectionFactory;
import java.io.IOException;
import java.util.concurrent.TimeoutException;
public class Producer_PubSub {
public static void main(String[] args) throws IOException, TimeoutException {
ConnectionFactory factory = new ConnectionFactory();
factory.setHost("192.168.91.130");
factory.setPort(5672);
factory.setVirtualHost("/itcast");
factory.setUsername("mochen");
factory.setPassword("mochen");
Connection connection = factory.newConnection();
Channel channel = connection.createChannel();
String exchangeName = "test_fanout";
channel.exchangeDeclare(exchangeName, BuiltinExchangeType.FANOUT,true,false,false,null);
String queue1Name = "test_fanout_queue1";
String queue2Name = "test_fanout_queue2";
channel.queueDeclare(queue1Name,true,false,false,null);
channel.queueDeclare(queue2Name,true,false,false,null);
channel.queueBind(queue1Name,exchangeName,"");
channel.queueBind(queue2Name,exchangeName,"");
String body = "日志信息:张三调用了findAll方法...日志级别:info...";
channel.basicPublish(exchangeName,"",null,body.getBytes());
channel.close();
connection.close();
}
}
|
Consumer_PubSub1
1
2
3
4
5
6
7
8
9
10
11
12
13
14
15
16
17
18
19
20
21
22
23
24
25
26
27
28
29
30
31
32
33
34
35
36
37
38
39
40
41
42
43
44
45
46
47
48
49
50
51
52
53
54
55
56
57
58
59
60
61
62
63
64
65
| package com.itheima.consumer;
import com.rabbitmq.client.*;
import java.io.IOException;
import java.util.concurrent.TimeoutException;
public class Consumer_PubSub1 {
public static void main(String[] args) throws IOException, TimeoutException {
ConnectionFactory factory = new ConnectionFactory();
factory.setHost("192.168.91.130");
factory.setPort(5672);
factory.setVirtualHost("/itcast");
factory.setUsername("mochen");
factory.setPassword("mochen");
Connection connection = factory.newConnection();
Channel channel = connection.createChannel();
String queue1Name = "test_fanout_queue1";
String queue2Name = "test_fanout_queue2";
Consumer consumer = new DefaultConsumer(channel){
@Override
public void handleDelivery(String consumerTag, Envelope envelope, AMQP.BasicProperties properties, byte[] body) throws IOException {
System.out.println("body:"+new String(body));
System.out.println("将日志信息打印到控制台.....");
}
};
channel.basicConsume(queue1Name,true,consumer);
}
}
|
Consumer_PubSub2
1
2
3
4
5
6
7
8
9
10
11
12
13
14
15
16
17
18
19
20
21
22
23
24
25
26
27
28
29
30
31
32
33
34
35
36
37
38
39
40
41
42
43
44
45
46
47
48
49
50
51
52
53
54
55
56
57
58
59
60
61
62
63
64
65
| package com.itheima.consumer;
import com.rabbitmq.client.*;
import java.io.IOException;
import java.util.concurrent.TimeoutException;
public class Consumer_PubSub2 {
public static void main(String[] args) throws IOException, TimeoutException {
ConnectionFactory factory = new ConnectionFactory();
factory.setHost("192.168.91.130");
factory.setPort(5672);
factory.setVirtualHost("/itcast");
factory.setUsername("mochen");
factory.setPassword("mochen");
Connection connection = factory.newConnection();
Channel channel = connection.createChannel();
String queue1Name = "test_fanout_queue1";
String queue2Name = "test_fanout_queue2";
Consumer consumer = new DefaultConsumer(channel){
@Override
public void handleDelivery(String consumerTag, Envelope envelope, AMQP.BasicProperties properties, byte[] body) throws IOException {
System.out.println("body:"+new String(body));
System.out.println("将日志信息保存数据库.....");
}
};
channel.basicConsume(queue2Name,true,consumer);
}
}
|
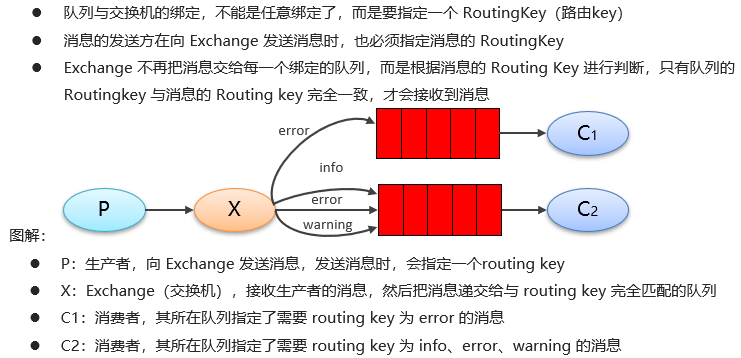
Routing路由模式
Producer_Routing.java
1
2
3
4
5
6
7
8
9
10
11
12
13
14
15
16
17
18
19
20
21
22
23
24
25
26
27
28
29
30
31
32
33
34
35
36
37
38
39
40
41
42
43
44
45
46
47
48
49
50
51
52
53
54
55
56
57
58
59
60
61
62
63
64
65
| package com.itheima.consumer;
import com.rabbitmq.client.*;
import java.io.IOException;
import java.util.concurrent.TimeoutException;
public class Consumer_PubSub2 {
public static void main(String[] args) throws IOException, TimeoutException {
ConnectionFactory factory = new ConnectionFactory();
factory.setHost("192.168.91.130");
factory.setPort(5672);
factory.setVirtualHost("/itcast");
factory.setUsername("mochen");
factory.setPassword("mochen");
Connection connection = factory.newConnection();
Channel channel = connection.createChannel();
String queue1Name = "test_fanout_queue1";
String queue2Name = "test_fanout_queue2";
Consumer consumer = new DefaultConsumer(channel){
@Override
public void handleDelivery(String consumerTag, Envelope envelope, AMQP.BasicProperties properties, byte[] body) throws IOException {
System.out.println("body:"+new String(body));
System.out.println("将日志信息保存数据库.....");
}
};
channel.basicConsume(queue2Name,true,consumer);
}
}
|
Consumer_Routing1.java
1
2
3
4
5
6
7
8
9
10
11
12
13
14
15
16
17
18
19
20
21
22
23
24
25
26
27
28
29
30
31
32
33
34
35
36
37
38
39
40
41
42
43
44
45
46
47
48
49
50
51
52
53
54
55
56
57
58
59
60
61
62
63
64
65
| package com.itheima.consumer;
import com.rabbitmq.client.*;
import java.io.IOException;
import java.util.concurrent.TimeoutException;
public class Consumer_Routing1 {
public static void main(String[] args) throws IOException, TimeoutException {
ConnectionFactory factory = new ConnectionFactory();
factory.setHost("192.168.91.130");
factory.setPort(5672);
factory.setVirtualHost("/itcast");
factory.setUsername("mochen");
factory.setPassword("mochen");
Connection connection = factory.newConnection();
Channel channel = connection.createChannel();
String queue1Name = "test_direct_queue1";
String queue2Name = "test_direct_queue2";
Consumer consumer = new DefaultConsumer(channel){
@Override
public void handleDelivery(String consumerTag, Envelope envelope, AMQP.BasicProperties properties, byte[] body) throws IOException {
System.out.println("body:"+new String(body));
System.out.println("将日志信息打印到控制台.....");
}
};
channel.basicConsume(queue2Name,true,consumer);
}
}
|
Consumer_Routing2.java
1
2
3
4
5
6
7
8
9
10
11
12
13
14
15
16
17
18
19
20
21
22
23
24
25
26
27
28
29
30
31
32
33
34
35
36
37
38
39
40
41
42
43
44
45
46
47
48
49
50
51
52
53
54
55
56
57
58
59
60
61
62
63
64
65
| package com.itheima.consumer;
import com.rabbitmq.client.*;
import java.io.IOException;
import java.util.concurrent.TimeoutException;
public class Consumer_Routing2 {
public static void main(String[] args) throws IOException, TimeoutException {
ConnectionFactory factory = new ConnectionFactory();
factory.setHost("192.168.91.130");
factory.setPort(5672);
factory.setVirtualHost("/itcast");
factory.setUsername("mochen");
factory.setPassword("mochen");
Connection connection = factory.newConnection();
Channel channel = connection.createChannel();
String queue1Name = "test_direct_queue1";
String queue2Name = "test_direct_queue2";
Consumer consumer = new DefaultConsumer(channel){
@Override
public void handleDelivery(String consumerTag, Envelope envelope, AMQP.BasicProperties properties, byte[] body) throws IOException {
System.out.println("body:"+new String(body));
System.out.println("将日志信息存储到数据库.....");
}
};
channel.basicConsume(queue1Name,true,consumer);
}
}
|
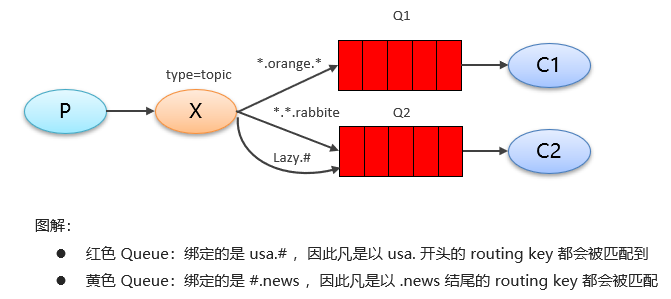
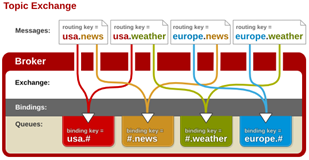
Topic通配符模式
Producer_Topic.java
1
2
3
4
5
6
7
8
9
10
11
12
13
14
15
16
17
18
19
20
21
22
23
24
25
26
27
28
29
30
31
32
33
34
35
36
37
38
39
40
41
42
43
44
45
46
47
48
49
50
51
52
53
54
55
56
57
58
59
60
61
62
63
64
65
66
67
68
69
70
71
72
73
74
75
76
77
78
79
80
| package com.itheima.producer;
import com.rabbitmq.client.BuiltinExchangeType;
import com.rabbitmq.client.Channel;
import com.rabbitmq.client.Connection;
import com.rabbitmq.client.ConnectionFactory;
import java.io.IOException;
import java.util.concurrent.TimeoutException;
public class Producer_Topics {
public static void main(String[] args) throws IOException, TimeoutException {
ConnectionFactory factory = new ConnectionFactory();
factory.setHost("192.168.91.130");
factory.setPort(5672);
factory.setVirtualHost("/itcast");
factory.setUsername("mochen");
factory.setPassword("mochen");
Connection connection = factory.newConnection();
Channel channel = connection.createChannel();
String exchangeName = "test_topic";
channel.exchangeDeclare(exchangeName, BuiltinExchangeType.TOPIC,true,false,false,null);
String queue1Name = "test_topic_queue1";
String queue2Name = "test_topic_queue2";
channel.queueDeclare(queue1Name,true,false,false,null);
channel.queueDeclare(queue2Name,true,false,false,null);
channel.queueBind(queue1Name,exchangeName,"#.error");
channel.queueBind(queue1Name,exchangeName,"order.*");
channel.queueBind(queue2Name,exchangeName,"*.*");
String body = "日志信息:张三调用了findAll方法...日志级别:info...";
channel.basicPublish(exchangeName,"goods.error",null,body.getBytes());
channel.close();
connection.close();
}
}
|
Consumer_Topic1.java
1
2
3
4
5
6
7
8
9
10
11
12
13
14
15
16
17
18
19
20
21
22
23
24
25
26
27
28
29
30
31
32
33
34
35
36
37
38
39
40
41
42
43
44
45
46
47
48
49
50
51
52
53
54
55
56
57
58
59
60
61
62
63
64
65
| package com.itheima.consumer;
import com.rabbitmq.client.*;
import java.io.IOException;
import java.util.concurrent.TimeoutException;
public class Consumer_Topic1 {
public static void main(String[] args) throws IOException, TimeoutException {
ConnectionFactory factory = new ConnectionFactory();
factory.setHost("192.168.91.130");
factory.setPort(5672);
factory.setVirtualHost("/itcast");
factory.setUsername("mochen");
factory.setPassword("mochen");
Connection connection = factory.newConnection();
Channel channel = connection.createChannel();
String queue1Name = "test_topic_queue1";
String queue2Name = "test_topic_queue2";
Consumer consumer = new DefaultConsumer(channel){
@Override
public void handleDelivery(String consumerTag, Envelope envelope, AMQP.BasicProperties properties, byte[] body) throws IOException {
System.out.println("body:"+new String(body));
System.out.println("将日志信息存入数据库.......");
}
};
channel.basicConsume(queue1Name,true,consumer);
}
}
|
Consumer_Topic.java
1
2
3
4
5
6
7
8
9
10
11
12
13
14
15
16
17
18
19
20
21
22
23
24
25
26
27
28
29
30
31
32
33
34
35
36
37
38
39
40
41
42
43
44
45
46
47
48
49
50
51
52
53
54
55
56
57
58
59
60
61
62
63
64
| package com.itheima.consumer;
import com.rabbitmq.client.*;
import java.io.IOException;
import java.util.concurrent.TimeoutException;
public class Consumer_Topic2 {
public static void main(String[] args) throws IOException, TimeoutException {
ConnectionFactory factory = new ConnectionFactory();
factory.setHost("192.168.91.130");
factory.setPort(5672);
factory.setVirtualHost("/itcast");
factory.setUsername("mochen");
factory.setPassword("mochen");
Connection connection = factory.newConnection();
Channel channel = connection.createChannel();
String queue1Name = "test_topic_queue1";
String queue2Name = "test_topic_queue2";
Consumer consumer = new DefaultConsumer(channel){
@Override
public void handleDelivery(String consumerTag, Envelope envelope, AMQP.BasicProperties properties, byte[] body) throws IOException {
System.out.println("body:"+new String(body));
System.out.println("将日志信息打印控制台.......");
}
};
channel.basicConsume(queue2Name,true,consumer);
}
}
|
SSpring整合RabbbitMQ

所有pom添加依赖
1
2
3
4
5
6
7
8
9
10
11
12
13
14
15
16
17
18
19
20
21
22
23
24
25
26
27
28
29
30
31
32
33
34
35
36
37
38
39
40
41
42
43
44
45
46
47
48
49
50
51
52
53
| <?xml version="1.0" encoding="UTF-8"?>
<project xmlns="http://maven.apache.org/POM/4.0.0"
xmlns:xsi="http://www.w3.org/2001/XMLSchema-instance"
xsi:schemaLocation="http://maven.apache.org/POM/4.0.0 http://maven.apache.org/xsd/maven-4.0.0.xsd">
<modelVersion>4.0.0</modelVersion>
<groupId>com.itheima</groupId>
<artifactId>spring-rabbitmq-producers</artifactId>
<version>1.0-SNAPSHOT</version>
<dependencies>
<dependency>
<groupId>org.springframework</groupId>
<artifactId>spring-context</artifactId>
<version>5.1.7.RELEASE</version>
</dependency>
<dependency>
<groupId>org.springframework.amqp</groupId>
<artifactId>spring-rabbit</artifactId>
<version>2.1.8.RELEASE</version>
</dependency>
<dependency>
<groupId>junit</groupId>
<artifactId>junit</artifactId>
<version>4.12</version>
</dependency>
<dependency>
<groupId>org.springframework</groupId>
<artifactId>spring-test</artifactId>
<version>5.1.7.RELEASE</version>
</dependency>
</dependencies>
<build>
<plugins>
<plugin>
<groupId>org.apache.maven.plugins</groupId>
<artifactId>maven-compiler-plugin</artifactId>
<version>3.8.0</version>
<configuration>
<source>1.8</source>
<target>1.8</target>
</configuration>
</plugin>
</plugins>
</build>
</project>
|
搭建Producers工程
配置整合
rabbitmq.properties:
1
2
3
4
5
| rabbitmq.host=192.168.91.130
rabbitmq.port=5672
rabbitmq.username=heima
rabbitmq.password=heima
rabbitmq.virtual-host=/itcast
|
spring-rabbitmq-producer.xml
1
2
3
4
5
6
7
8
9
10
11
12
13
14
15
16
17
18
19
20
21
22
23
24
25
26
27
28
29
30
31
32
33
34
35
36
37
38
39
40
41
42
43
44
45
46
47
48
49
50
51
52
53
54
55
56
57
58
59
60
61
62
63
64
65
66
67
68
69
70
71
72
73
74
75
76
77
78
79
| <?xml version="1.0" encoding="UTF-8"?>
<beans xmlns="http://www.springframework.org/schema/beans"
xmlns:xsi="http://www.w3.org/2001/XMLSchema-instance"
xmlns:context="http://www.springframework.org/schema/context"
xmlns:rabbit="http://www.springframework.org/schema/rabbit"
xsi:schemaLocation="http://www.springframework.org/schema/beans
http://www.springframework.org/schema/beans/spring-beans.xsd
http://www.springframework.org/schema/context
https://www.springframework.org/schema/context/spring-context.xsd
http://www.springframework.org/schema/rabbit
http://www.springframework.org/schema/rabbit/spring-rabbit.xsd">
<context:property-placeholder location="classpath:rabbitmq.properties"/>
<rabbit:connection-factory id="connectionFactory" host="${rabbitmq.host}"
port="${rabbitmq.port}"
username="${rabbitmq.username}"
password="${rabbitmq.password}"
virtual-host="${rabbitmq.virtual-host}"/>
<rabbit:admin connection-factory="connectionFactory"/>
<rabbit:queue id="spring_queue" name="spring_queue" auto-declare="true"/>
<rabbit:queue id="spring_fanout_queue_1" name="spring_fanout_queue_1" auto-declare="true"/>
<rabbit:queue id="spring_fanout_queue_2" name="spring_fanout_queue_2" auto-declare="true"/>
<rabbit:fanout-exchange id="spring_fanout_exchange" name="spring_fanout_exchange" auto-declare="true">
<rabbit:bindings>
<rabbit:binding queue="spring_fanout_queue_1" />
<rabbit:binding queue="spring_fanout_queue_2"/>
</rabbit:bindings>
</rabbit:fanout-exchange>
<rabbit:queue id="spring_topic_queue_star" name="spring_topic_queue_star" auto-declare="true"/>
<rabbit:queue id="spring_topic_queue_well" name="spring_topic_queue_well" auto-declare="true"/>
<rabbit:queue id="spring_topic_queue_well2" name="spring_topic_queue_well2" auto-declare="true"/>
<rabbit:topic-exchange id="spring_topic_exchange" name="spring_topic_exchange" auto-declare="true">
<rabbit:bindings>
<rabbit:binding pattern="heima.*" queue="spring_topic_queue_star"/>
<rabbit:binding pattern="heima.#" queue="spring_topic_queue_well"/>
<rabbit:binding pattern="itcast.#" queue="spring_topic_queue_well2"/>
</rabbit:bindings>
</rabbit:topic-exchange>
<rabbit:template id="rabbitTemplate" connection-factory="connectionFactory"/>
</beans>
|
发送消息
ProducerTest.java
1
2
3
4
5
6
7
8
9
10
11
12
13
14
15
16
17
18
19
20
21
22
23
24
25
26
27
28
29
30
31
32
33
34
35
36
37
38
39
40
41
42
43
44
45
46
47
48
49
50
51
52
53
54
55
56
57
58
59
60
61
| package com.itheima;
import org.junit.Test;
import org.junit.runner.RunWith;
import org.springframework.amqp.rabbit.core.RabbitTemplate;
import org.springframework.beans.factory.annotation.Autowired;
import org.springframework.test.context.ContextConfiguration;
import org.springframework.test.context.junit4.SpringJUnit4ClassRunner;
@RunWith(SpringJUnit4ClassRunner.class)
@ContextConfiguration(locations = "classpath:spring/spring-rabbitmq.xml")
public class ProducerTest {
@Autowired
private RabbitTemplate rabbitTemplate;
@Test
public void queueTest(){
rabbitTemplate.convertAndSend("spring_queue", "只发队列spring_queue的消息。");
}
@Test
public void fanoutTest(){
rabbitTemplate.convertAndSend("spring_fanout_exchange", "", "发送到spring_fanout_exchange交换机的广播消息");
}
@Test
public void topicTest(){
rabbitTemplate.convertAndSend("spring_topic_exchange", "heima.bj", "发送到spring_topic_exchange交换机heima.bj的消息");
rabbitTemplate.convertAndSend("spring_topic_exchange", "heima.bj.1", "发送到spring_topic_exchange交换机heima.bj.1的消息");
rabbitTemplate.convertAndSend("spring_topic_exchange", "heima.bj.2", "发送到spring_topic_exchange交换机heima.bj.2的消息");
rabbitTemplate.convertAndSend("spring_topic_exchange", "itcast.cn", "发送到spring_topic_exchange交换机itcast.cn的消息");
}
}
|
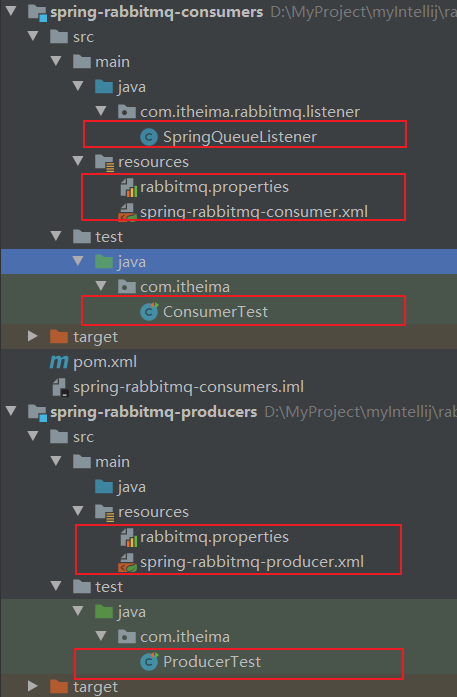
搭建consumers工程:
配置整合
- 创建
spring-rabbitmq-consumer\src\main\resources\properties\rabbitmq.properties连接参数等配置文件;
1
2
3
4
5
| rabbitmq.host=192.168.91.130
rabbitmq.port=5672
rabbitmq.username=heima
rabbitmq.password=heima
rabbitmq.virtual-host=/itcast
|
- 创建
spring-rabbitmq-consumer\src\main\resources\spring\spring-rabbitmq.xml 整合配置文件;
1
2
3
4
5
6
7
8
9
10
11
12
13
14
15
16
17
18
19
20
21
22
23
24
25
26
27
28
29
30
31
32
33
34
35
36
37
| <?xml version="1.0" encoding="UTF-8"?>
<beans xmlns="http://www.springframework.org/schema/beans"
xmlns:xsi="http://www.w3.org/2001/XMLSchema-instance"
xmlns:context="http://www.springframework.org/schema/context"
xmlns:rabbit="http://www.springframework.org/schema/rabbit"
xsi:schemaLocation="http://www.springframework.org/schema/beans
http://www.springframework.org/schema/beans/spring-beans.xsd
http://www.springframework.org/schema/context
https://www.springframework.org/schema/context/spring-context.xsd
http://www.springframework.org/schema/rabbit
http://www.springframework.org/schema/rabbit/spring-rabbit.xsd">
<context:property-placeholder location="classpath:properties/rabbitmq.properties"/>
<rabbit:connection-factory id="connectionFactory" host="${rabbitmq.host}"
port="${rabbitmq.port}"
username="${rabbitmq.username}"
password="${rabbitmq.password}"
virtual-host="${rabbitmq.virtual-host}"/>
<bean id="springQueueListener" class="com.itheima.rabbitmq.listener.SpringQueueListener"/>
<bean id="fanoutListener1" class="com.itheima.rabbitmq.listener.FanoutListener1"/>
<bean id="fanoutListener2" class="com.itheima.rabbitmq.listener.FanoutListener2"/>
<bean id="topicListenerStar" class="com.itheima.rabbitmq.listener.TopicListenerStar"/>
<bean id="topicListenerWell" class="com.itheima.rabbitmq.listener.TopicListenerWell"/>
<bean id="topicListenerWell2" class="com.itheima.rabbitmq.listener.TopicListenerWell2"/>
<rabbit:listener-container connection-factory="connectionFactory" auto-declare="true">
<rabbit:listener ref="springQueueListener" queue-names="spring_queue"/>
<rabbit:listener ref="fanoutListener1" queue-names="spring_fanout_queue_1"/>
<rabbit:listener ref="fanoutListener2" queue-names="spring_fanout_queue_2"/>
<rabbit:listener ref="topicListenerStar" queue-names="spring_topic_queue_star"/>
<rabbit:listener ref="topicListenerWell" queue-names="spring_topic_queue_well"/>
<rabbit:listener ref="topicListenerWell2" queue-names="spring_topic_queue_well2"/>
</rabbit:listener-container>
</beans>
|
消息监听器
1)队列监听器
创建 spring-rabbitmq-consumer\src\main\java\com\itheima\rabbitmq\listener\SpringQueueListener.java
1
2
3
4
5
6
7
8
9
10
11
12
13
14
15
| public class SpringQueueListener implements MessageListener {
public void onMessage(Message message) {
try {
String msg = new String(message.getBody(), "utf-8");
System.out.printf("接收路由名称为:%s,路由键为:%s,队列名为:%s的消息:%s \n",
message.getMessageProperties().getReceivedExchange(),
message.getMessageProperties().getReceivedRoutingKey(),
message.getMessageProperties().getConsumerQueue(),
msg);
} catch (Exception e) {
e.printStackTrace();
}
}
}
|
2)广播监听器1
创建 spring-rabbitmq-consumer\src\main\java\com\itheima\rabbitmq\listener\FanoutListener1.java
1
2
3
4
5
6
7
8
9
10
11
12
13
14
15
16
| public class FanoutListener1 implements MessageListener {
public void onMessage(Message message) {
try {
String msg = new String(message.getBody(), "utf-8");
System.out.printf("广播监听器1:接收路由名称为:%s,路由键为:%s,队列名为:%s的消息:%s \n",
message.getMessageProperties().getReceivedExchange(),
message.getMessageProperties().getReceivedRoutingKey(),
message.getMessageProperties().getConsumerQueue(),
msg);
} catch (Exception e) {
e.printStackTrace();
}
}
}
|
3)广播监听器2
创建 spring-rabbitmq-consumer\src\main\java\com\itheima\rabbitmq\listener\FanoutListener2.java
1
2
3
4
5
6
7
8
9
10
11
12
13
14
15
| public class FanoutListener2 implements MessageListener {
public void onMessage(Message message) {
try {
String msg = new String(message.getBody(), "utf-8");
System.out.printf("广播监听器2:接收路由名称为:%s,路由键为:%s,队列名为:%s的消息:%s \n",
message.getMessageProperties().getReceivedExchange(),
message.getMessageProperties().getReceivedRoutingKey(),
message.getMessageProperties().getConsumerQueue(),
msg);
} catch (Exception e) {
e.printStackTrace();
}
}
}
|
4)星号通配符监听器
创建 spring-rabbitmq-consumer\src\main\java\com\itheima\rabbitmq\listener\TopicListenerStar.java
1
2
3
4
5
6
7
8
9
10
11
12
13
14
15
16
| public class TopicListenerStar implements MessageListener {
public void onMessage(Message message) {
try {
String msg = new String(message.getBody(), "utf-8");
System.out.printf("通配符*监听器:接收路由名称为:%s,路由键为:%s,队列名为:%s的消息:%s \n",
message.getMessageProperties().getReceivedExchange(),
message.getMessageProperties().getReceivedRoutingKey(),
message.getMessageProperties().getConsumerQueue(),
msg);
} catch (Exception e) {
e.printStackTrace();
}
}
}
|
5)井号通配符监听器
创建 spring-rabbitmq-consumer\src\main\java\com\itheima\rabbitmq\listener\TopicListenerWell.java
1
2
3
4
5
6
7
8
9
10
11
12
13
14
15
16
| public class TopicListenerWell implements MessageListener {
public void onMessage(Message message) {
try {
String msg = new String(message.getBody(), "utf-8");
System.out.printf("通配符#监听器:接收路由名称为:%s,路由键为:%s,队列名为:%s的消息:%s \n",
message.getMessageProperties().getReceivedExchange(),
message.getMessageProperties().getReceivedRoutingKey(),
message.getMessageProperties().getConsumerQueue(),
msg);
} catch (Exception e) {
e.printStackTrace();
}
}
}
|
6)井号通配符监听器2
创建 spring-rabbitmq-consumer\src\main\java\com\itheima\rabbitmq\listener\TopicListenerWell2.java
1
2
3
4
5
6
7
8
9
10
11
12
13
14
15
16
| public class TopicListenerWell2 implements MessageListener {
public void onMessage(Message message) {
try {
String msg = new String(message.getBody(), "utf-8");
System.out.printf("通配符#监听器2:接收路由名称为:%s,路由键为:%s,队列名为:%s的消息:%s \n",
message.getMessageProperties().getReceivedExchange(),
message.getMessageProperties().getReceivedRoutingKey(),
message.getMessageProperties().getConsumerQueue(),
msg);
} catch (Exception e) {
e.printStackTrace();
}
}
}
|
SpringBoot整合RabbitMQ
在Spring项目中,可以使用Spring-Rabbit去操作RabbitMQ
https://github.com/spring-projects/spring-amqp
尤其是在spring boot项目中只需要引入对应的amqp启动器依赖即可,方便的使用RabbitTemplate发送消息,使用注解接收消息。
一般在开发过程中:
生产者工程:
application.yml文件配置RabbitMQ相关信息;
在生产者工程中编写配置类,用于创建交换机和队列,并进行绑定
注入RabbitTemplate对象,通过RabbitTemplate对象发送消息到交换机
消费者工程:
application.yml文件配置RabbitMQ相关信息
创建消息处理类,用于接收队列中的消息并进行处理
搭建生产者工程
创建工程
创建生产者工程springboot-rabbitmq-producer
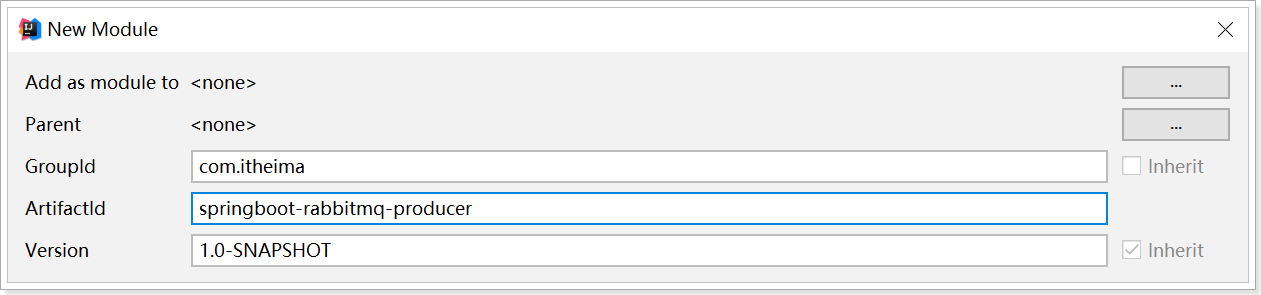

添加依赖
修改pom.xml文件内容为如下:
1
2
3
4
5
6
7
8
9
10
11
12
13
14
15
16
17
18
19
20
21
22
23
24
25
| <?xml version="1.0" encoding="UTF-8"?>
<project xmlns="http://maven.apache.org/POM/4.0.0"
xmlns:xsi="http://www.w3.org/2001/XMLSchema-instance"
xsi:schemaLocation="http://maven.apache.org/POM/4.0.0 http://maven.apache.org/xsd/maven-4.0.0.xsd">
<modelVersion>4.0.0</modelVersion>
<parent>
<groupId>org.springframework.boot</groupId>
<artifactId>spring-boot-starter-parent</artifactId>
<version>2.1.4.RELEASE</version>
</parent>
<groupId>com.itheima</groupId>
<artifactId>springboot-rabbitmq-producer</artifactId>
<version>1.0-SNAPSHOT</version>
<dependencies>
<dependency>
<groupId>org.springframework.boot</groupId>
<artifactId>spring-boot-starter-amqp</artifactId>
</dependency>
<dependency>
<groupId>org.springframework.boot</groupId>
<artifactId>spring-boot-starter-test</artifactId>
</dependency>
</dependencies>
</project>
|
启动类
1
2
3
4
5
6
7
8
9
10
11
12
| package com.itheima.rabbitmq;
import org.springframework.boot.SpringApplication;
import org.springframework.boot.autoconfigure.SpringBootApplication;
@SpringBootApplication
public class ProducerApplication {
public static void main(String[] args) {
SpringApplication.run(ProducerApplication.class);
}
}
|
配置RabbitMQ
配置文件
创建application.yml,内容如下:
1
2
3
4
5
6
7
| spring:
rabbitmq:
host: localhost
port: 5672
virtual-host: /itcast
username: heima
password: heima
|
绑定交换机和队列
创建RabbitMQ队列与交换机绑定的配置类com.itheima.rabbitmq.config.RabbitMQConfig
1
2
3
4
5
6
7
8
9
10
11
12
13
14
15
16
17
18
19
20
21
22
23
24
25
26
27
28
29
30
31
32
33
34
| package com.itheima.rabbitmq.config;
import org.springframework.amqp.core.*;
import org.springframework.beans.factory.annotation.Qualifier;
import org.springframework.context.annotation.Bean;
import org.springframework.context.annotation.Configuration;
@Configuration
public class RabbitMQConfig {
public static final String ITEM_TOPIC_EXCHANGE = "item_topic_exchange";
public static final String ITEM_QUEUE = "item_queue";
@Bean("itemTopicExchange")
public Exchange topicExchange(){
return ExchangeBuilder.topicExchange(ITEM_TOPIC_EXCHANGE).durable(true).build();
}
@Bean("itemQueue")
public Queue itemQueue(){
return QueueBuilder.durable(ITEM_QUEUE).build();
}
@Bean
public Binding itemQueueExchange(@Qualifier("itemQueue") Queue queue,
@Qualifier("itemTopicExchange") Exchange exchange){
return BindingBuilder.bind(queue).to(exchange).with("item.#").noargs();
}
}
|
搭建消费者工程
创建工程
创建消费者工程springboot-rabbitmq-consumer
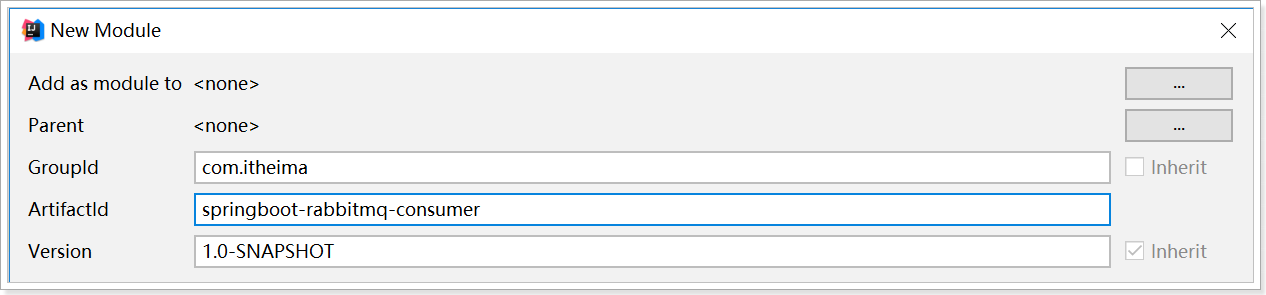

添加依赖
修改pom.xml文件内容为如下:
1
2
3
4
5
6
7
8
9
10
11
12
13
14
15
16
17
18
19
20
21
22
| <?xml version="1.0" encoding="UTF-8"?>
<project xmlns="http://maven.apache.org/POM/4.0.0"
xmlns:xsi="http://www.w3.org/2001/XMLSchema-instance"
xsi:schemaLocation="http://maven.apache.org/POM/4.0.0 http://maven.apache.org/xsd/maven-4.0.0.xsd">
<modelVersion>4.0.0</modelVersion>
<parent>
<groupId>org.springframework.boot</groupId>
<artifactId>spring-boot-starter-parent</artifactId>
<version>2.1.4.RELEASE</version>
</parent>
<groupId>com.itheima</groupId>
<artifactId>springboot-rabbitmq-consumer</artifactId>
<version>1.0-SNAPSHOT</version>
<dependencies>
<dependency>
<groupId>org.springframework.boot</groupId>
<artifactId>spring-boot-starter-amqp</artifactId>
</dependency>
</dependencies>
</project>
|
启动类
1
2
3
4
5
6
7
8
9
10
11
| package com.itheima.rabbitmq;
import org.springframework.boot.SpringApplication;
import org.springframework.boot.autoconfigure.SpringBootApplication;
@SpringBootApplication
public class ConsumerApplication {
public static void main(String[] args) {
SpringApplication.run(ConsumerApplication.class);
}
}
|
配置RabbitMQ
创建application.yml,内容如下:
1
2
3
4
5
6
7
| spring:
rabbitmq:
host: 192.168.91.130
port: 5672
virtual-host: /itcast
username: heima
password: heima
|
消息监听处理类
编写消息监听器com.itheima.rabbitmq.listener.MyListener
1
2
3
4
5
6
7
8
9
10
11
12
13
14
15
16
17
18
| package com.itheima.rabbitmq.listener;
import org.springframework.amqp.rabbit.annotation.RabbitListener;
import org.springframework.stereotype.Component;
@Component
public class MyListener {
@RabbitListener(queues = "item_queue")
public void myListener1(String message){
System.out.println("消费者接收到的消息为:" + message);
}
}
|
测试
在生产者工程springboot-rabbitmq-producer中创建测试类,发送消息:
1
2
3
4
5
6
7
8
9
10
11
12
13
14
15
16
17
18
19
20
21
22
23
24
| package com.itheima.rabbitmq;
import com.itheima.rabbitmq.config.RabbitMQConfig;
import org.junit.Test;
import org.junit.runner.RunWith;
import org.springframework.amqp.rabbit.core.RabbitTemplate;
import org.springframework.beans.factory.annotation.Autowired;
import org.springframework.boot.test.context.SpringBootTest;
import org.springframework.test.context.junit4.SpringRunner;
@RunWith(SpringRunner.class)
@SpringBootTest
public class RabbitMQTest {
@Autowired
private RabbitTemplate rabbitTemplate;
@Test
public void test(){
rabbitTemplate.convertAndSend(RabbitMQConfig.ITEM_TOPIC_EXCHANGE, "item.insert", "商品新增,routing key 为item.insert");
rabbitTemplate.convertAndSend(RabbitMQConfig.ITEM_TOPIC_EXCHANGE, "item.update", "商品修改,routing key 为item.update");
rabbitTemplate.convertAndSend(RabbitMQConfig.ITEM_TOPIC_EXCHANGE, "item.delete", "商品删除,routing key 为item.delete");
}
}
|
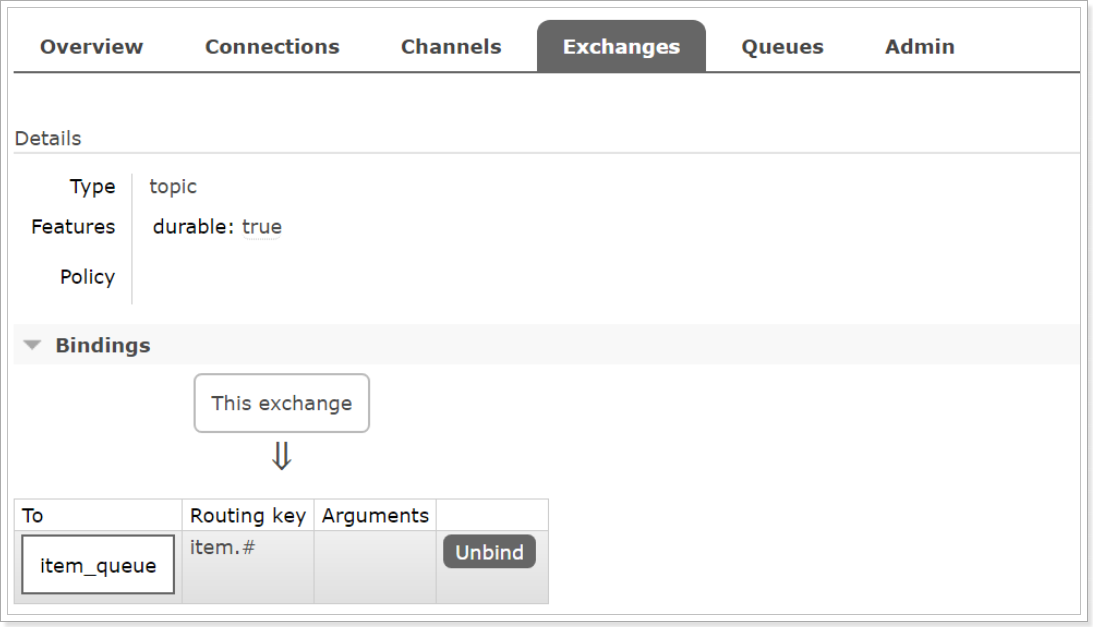
先运行上述测试程序(交换机和队列才能先被声明和绑定),然后启动消费者;在消费者工程springboot-rabbitmq-consumer中控制台查看是否接收到对应消息。
另外;也可以在RabbitMQ的管理控制台中查看到交换机与队列的绑定:
RabbitMQ高级特性
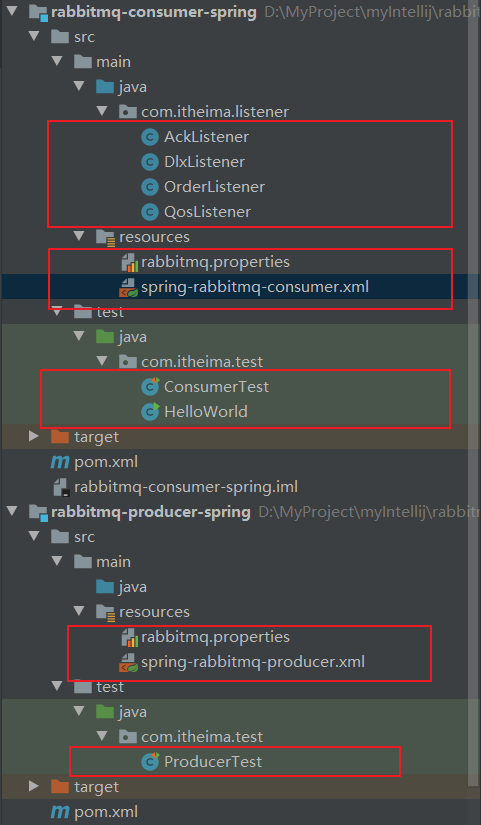
高级特性介绍中使用的代码目录,详细查看代码附录
消息可靠性投递
在使用 RabbitMQ 的时候,作为消息发送方希望杜绝任何消息丢失或者投递失败场景。RabbitMQ 为我们提供了两种方式用来控制消息的投递可靠性模式。
rabbitmq 整个消息投递的路径为:
producer—>rabbitmq broker—>exchange—>queue—>consumer
我们将利用这两个 callback 控制消息的可靠性投递
confirm 确认模式
1、设置ConnectionFactory的publisher-confirms=”true” 开启确认模式。
src/main/resources/spring-rabbitmq-producer.xml
1
2
3
4
5
6
7
8
9
|
<rabbit:connection-factory id="connectionFactory" host="${rabbitmq.host}"
port="${rabbitmq.port}"
username="${rabbitmq.username}"
password="${rabbitmq.password}"
virtual-host="${rabbitmq.virtual-host}"
publisher-confirms="true"
/>
|
2、使用rabbitTemplate.setConfirmCallback设置回调函数。当消息发送到exchange后回调confirm方法。在方法中判断ack,如果为true,则发送成功,如果为false,则发送失败,需要处理。
com/itheima/test/ProducerTest.java
1
2
3
4
5
6
7
8
9
10
11
12
13
14
15
16
17
18
19
20
21
22
23
24
25
26
27
28
29
30
31
32
33
34
35
36
|
@Test
public void testConfirm() {
rabbitTemplate.setConfirmCallback(new RabbitTemplate.ConfirmCallback() {
@Override
public void confirm(CorrelationData correlationData, boolean ack, String cause) {
System.out.println("confirm方法被执行了....");
if (ack) {
System.out.println("接收成功消息" + cause);
} else {
System.out.println("接收失败消息" + cause);
}
}
});
rabbitTemplate.convertAndSend("test_exchange_confirm111", "confirm", "message confirm....");
}
|
return 退回模式
1、设置ConnectionFactory的publisher-returns=”true” 开启 退回模式。
src/main/resources/spring-rabbitmq-producer.xml
1
2
3
4
5
6
7
8
9
|
<rabbit:connection-factory id="connectionFactory" host="${rabbitmq.host}"
port="${rabbitmq.port}"
username="${rabbitmq.username}"
password="${rabbitmq.password}"
virtual-host="${rabbitmq.virtual-host}"
publisher-confirms="true"
publisher-returns="true"
/>
|
2、使用rabbitTemplate.setReturnCallback设置退回函数,当消息从exchange路由到queue失败后,如果设置了rabbitTemplate.setMandatory(true)参数,则会将消息退回给producer。并执行回调函数returnedMessage。
com/itheima/test/ProducerTest.java
1
2
3
4
5
6
7
8
9
10
11
12
13
14
15
16
17
18
19
20
21
22
23
24
25
26
27
28
29
30
31
32
33
34
35
36
37
38
39
40
41
42
43
44
45
|
@Test
public void testReturn() {
rabbitTemplate.setMandatory(true);
rabbitTemplate.setReturnCallback(new RabbitTemplate.ReturnCallback() {
@Override
public void returnedMessage(Message message, int replyCode, String replyText, String exchange, String routingKey) {
System.out.println("return 执行了....");
System.out.println(message);
System.out.println(replyCode);
System.out.println(replyText);
System.out.println(exchange);
System.out.println(routingKey);
}a]
});
rabbitTemplate.convertAndSend("test_exchange_confirm", "confirm", "message confirm....");
}
|
Ø在RabbitMQ中也提供了事务机制,但是性能较差,此处不做讲解。
使用channel下列方法,完成事务控制:
txSelect(), 用于将当前channel设置成transaction模式
txCommit(),用于提交事务
txRollback(),用于回滚事务
Consumer ACK
ack指Acknowledge,确认。 表示消费端收到消息后的确认方式。
有三种确认方式:
其中自动确认是指,当消息一旦被Consumer接收到,则自动确认收到,并将相应 message 从 RabbitMQ 的消息缓存中移除。但是在实际业务处理中,很可能消息接收到,业务处理出现异常,那么该消息就会丢失。如果设置了手动确认方式,则需要在业务处理成功后,调用channel.basicAck(),手动签收,如果出现异常,则调用channel.basicNack()方法,让其自动重新发送消息。
代码实现
1、在rabbit:listener-container标签中设置acknowledge属性,设置ack方式 none:自动确认,manual:手动确认
src/main/resources/spring-rabbitmq-consumer.xml
1
2
3
4
5
6
7
8
9
10
11
12
13
14
15
16
17
18
19
20
21
22
23
24
25
26
27
28
29
30
31
32
| <?xml version="1.0" encoding="UTF-8"?>
<beans xmlns="http://www.springframework.org/schema/beans"
xmlns:xsi="http://www.w3.org/2001/XMLSchema-instance"
xmlns:context="http://www.springframework.org/schema/context"
xmlns:rabbit="http://www.springframework.org/schema/rabbit"
xsi:schemaLocation="http://www.springframework.org/schema/beans
http://www.springframework.org/schema/beans/spring-beans.xsd
http://www.springframework.org/schema/context
https://www.springframework.org/schema/context/spring-context.xsd
http://www.springframework.org/schema/rabbit
http://www.springframework.org/schema/rabbit/spring-rabbit.xsd">
<context:property-placeholder location="classpath:rabbitmq.properties"/>
<rabbit:connection-factory id="connectionFactory" host="${rabbitmq.host}"
port="${rabbitmq.port}"
username="${rabbitmq.username}"
password="${rabbitmq.password}"
virtual-host="${rabbitmq.virtual-host}"/>
<context:component-scan base-package="com.itheima.listener" />
<rabbit:listener-container connection-factory="connectionFactory" acknowledge="manual" prefetch="1" >
<rabbit:listener ref="ackListener" queue-names="test_queue_confirm"></rabbit:listener>
</rabbit:listener-container>
</beans>
|
2、如果在消费端没有出现异常,则调用channel.basicAck(deliveryTag,false);方法确认签收消息
如果出现异常,则在catch中调用 basicNack或 basicReject,拒绝消息,让MQ重新发送消息。
src/main/java/com/itheima/listener/AckListener.java
1
2
3
4
5
6
7
8
9
10
11
12
13
14
15
16
17
18
19
20
21
22
23
24
25
26
27
28
29
30
31
32
33
34
35
36
37
38
39
|
@Component
public class AckListener implements ChannelAwareMessageListener {
@Override
public void onMessage(Message message, Channel channel) throws Exception {
long deliveryTag = message.getMessageProperties().getDeliveryTag();
try {
System.out.println(new String(message.getBody()));
System.out.println("处理业务逻辑...");
int i = 3/0;
channel.basicAck(deliveryTag,true);
} catch (Exception e) {
channel.basicNack(deliveryTag,true,true);
}
}
}
|
消费端限流
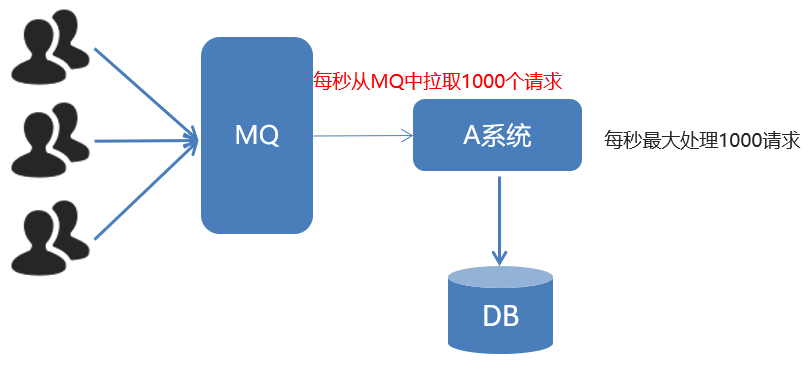
代码实现
1、在rabbit:listener-container 中配置 prefetch属性设置消费端一次拉取多少消息、
2、消费端的确认模式一定为手动确认。acknowledge=”manual”
src/main/resources/spring-rabbitmq-consumer.xml
1
2
3
4
|
<rabbit:listener-container connection-factory="connectionFactory" acknowledge="manual" prefetch="1" >
<rabbit:listener ref="qosListener" queue-names="test_queue_confirm"></rabbit:listener>-->
</rabbit:listener-container>
|
3、实现
src/main/java/com/itheima/listener/QosListener.java
1
2
3
4
5
6
7
8
9
10
11
12
13
14
15
16
17
18
19
20
21
22
23
24
25
|
@Component
public class QosListener implements ChannelAwareMessageListener {
@Override
public void onMessage(Message message, Channel channel) throws Exception {
Thread.sleep(1000);
System.out.println(new String(message.getBody()));
channel.basicAck(message.getMessageProperties().getDeliveryTag(),true);
}
}
|
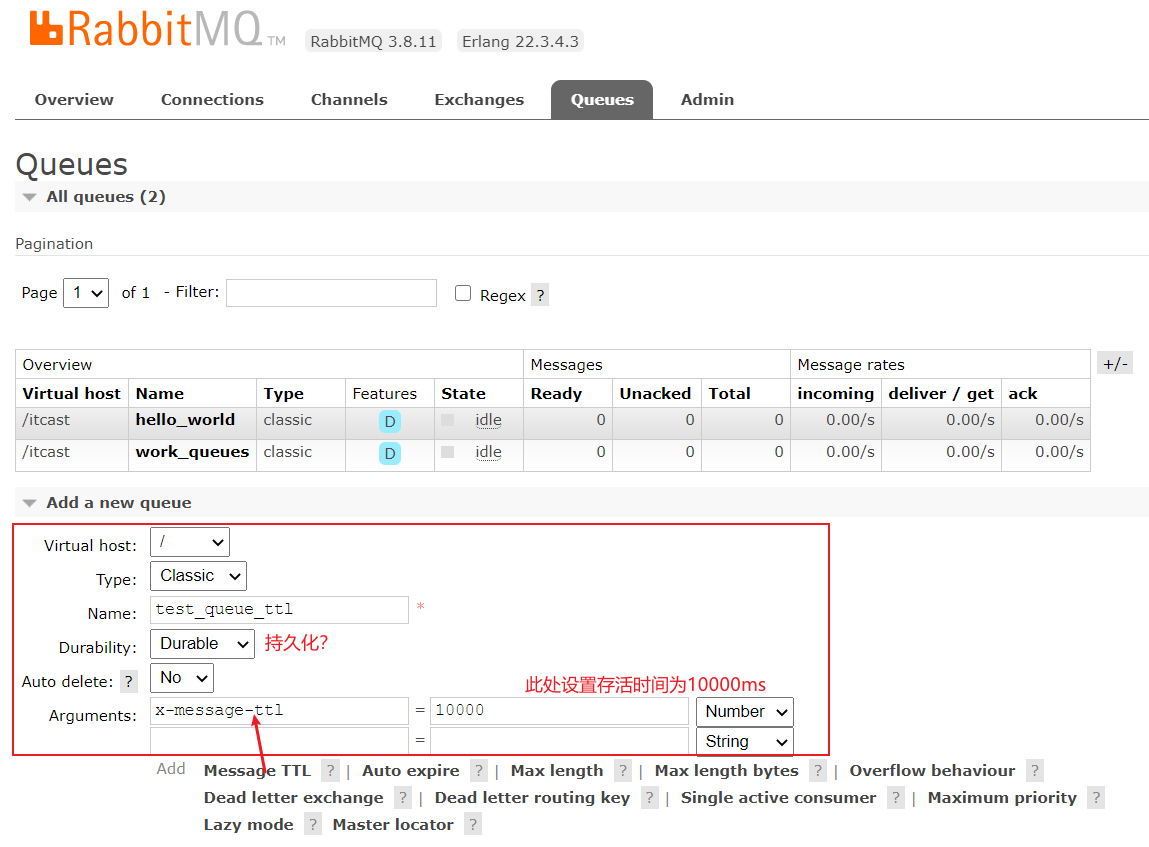
TTL
TTL 全称 Time To Live(存活时间/过期时间)。
当消息到达存活时间后,还没有被消费,会被自动清除。
RabbitMQ可以对消息设置过期时间,也可以对整个队列(Queue)设置过期时间。
控制台实现
添加队列
添加交换机
为交换机添加队列
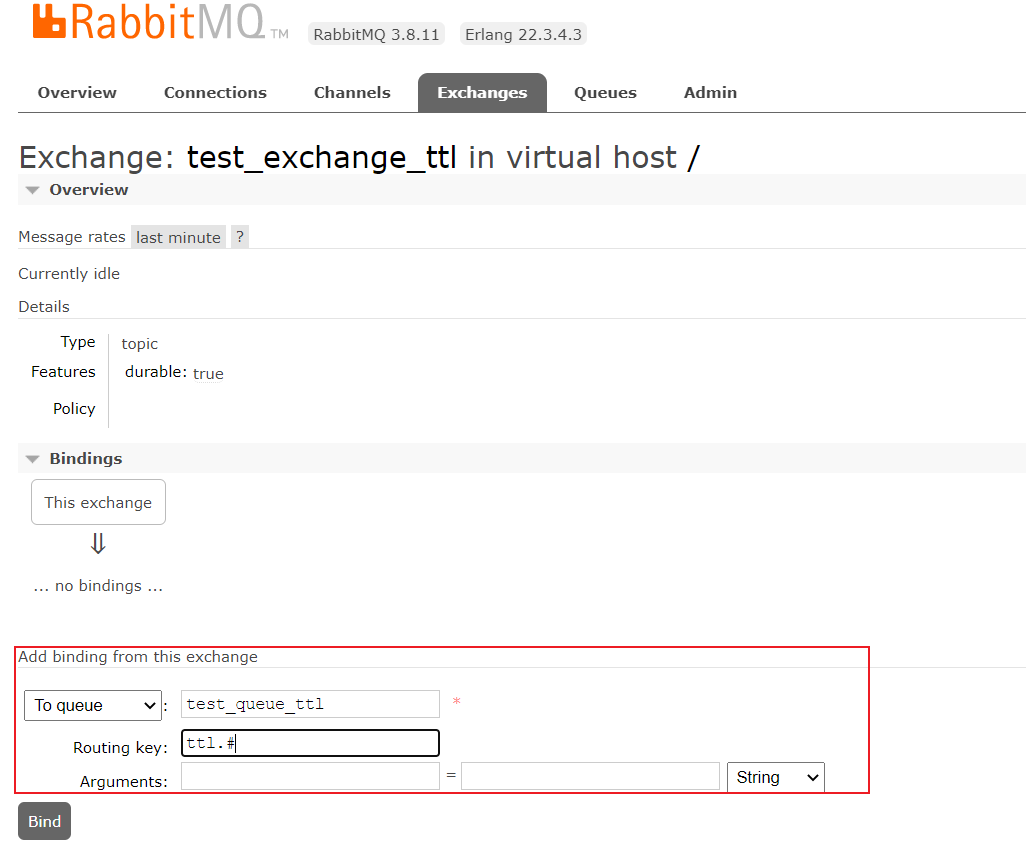
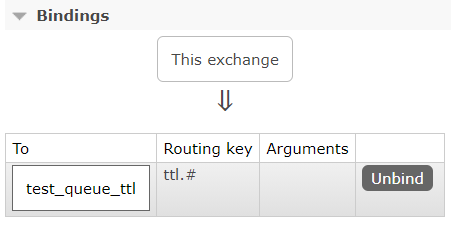
绑定成功
交换机中发布消息
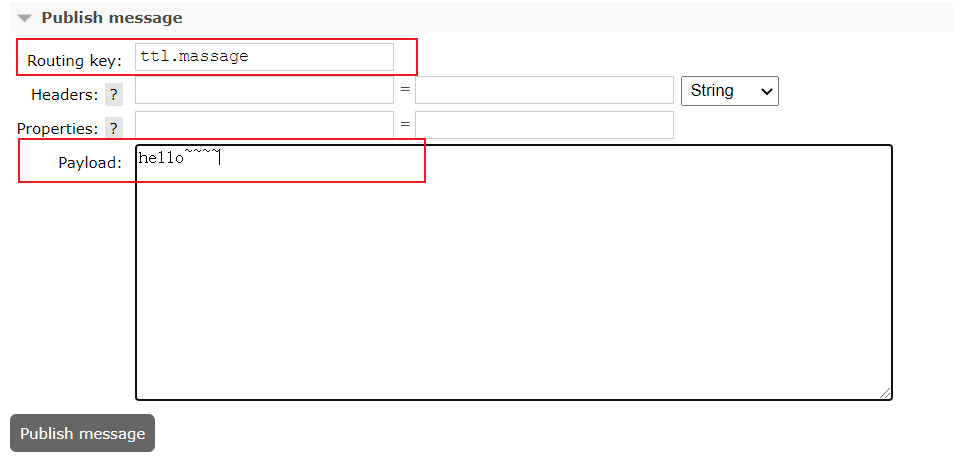
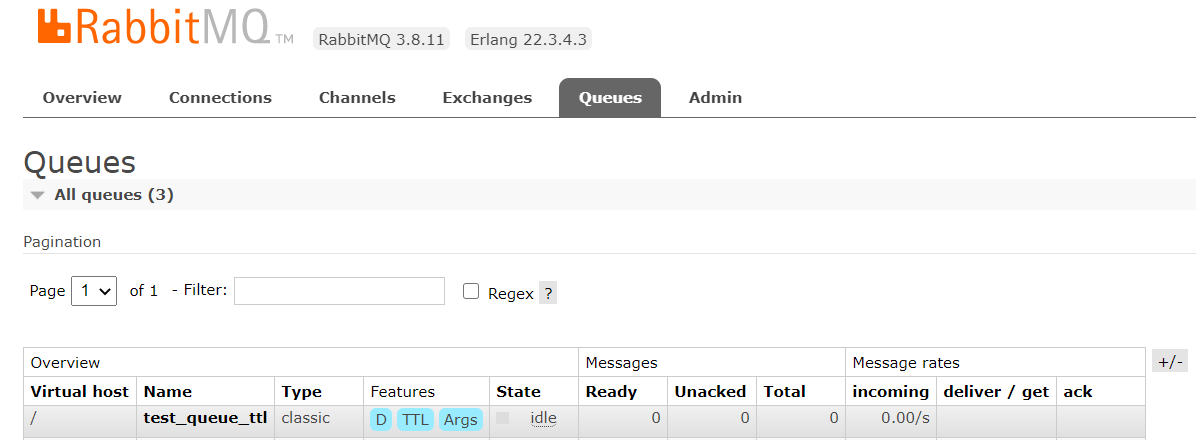
回到队列中可以看见消息过了十秒被清除了
代码实现
1、设置队列过期时间使用参数:x-message-ttl,单位:ms(毫秒),会对整个队列消息统一过期。
2、设置消息过期时间使用参数:expiration。单位:ms(毫秒),当该消息在队列头部时(消费时),会单独判断这一消息是否过期。
3、如果两者都进行了设置,以时间短的为准。
src/main/resources/spring-rabbitmq-producer.xml
1
2
3
4
5
6
7
8
9
10
11
12
13
14
15
|
<rabbit:queue name="test_queue_ttl" id="test_queue_ttl">
<rabbit:queue-arguments>
<entry key="x-message-ttl" value="100000" value-type="java.lang.Integer"></entry>
</rabbit:queue-arguments>
</rabbit:queue>
<rabbit:topic-exchange name="test_exchange_ttl" >
<rabbit:bindings>
<rabbit:binding pattern="ttl.#" queue="test_queue_ttl"></rabbit:binding>
</rabbit:bindings>
</rabbit:topic-exchange>
|
测试
src/test/java/com/itheima/test/ProducerTest.java
1
2
3
4
5
6
7
8
9
10
11
12
13
14
15
16
17
18
19
20
21
22
23
24
25
26
27
28
29
30
31
32
33
34
35
36
37
38
39
40
41
42
43
44
45
46
47
48
49
50
51
52
53
|
@Test
public void testTtl() {
MessagePostProcessor messagePostProcessor = new MessagePostProcessor() {
@Override
public Message postProcessMessage(Message message) throws AmqpException {
message.getMessageProperties().setExpiration("5000");
return message;
}
};
for (int i = 0; i < 10; i++) {
if(i == 5){
rabbitTemplate.convertAndSend("test_exchange_ttl", "ttl.hehe", "message ttl....",messagePostProcessor);
}else{
rabbitTemplate.convertAndSend("test_exchange_ttl", "ttl.hehe", "message ttl....");
}
}
}
|
死信队列
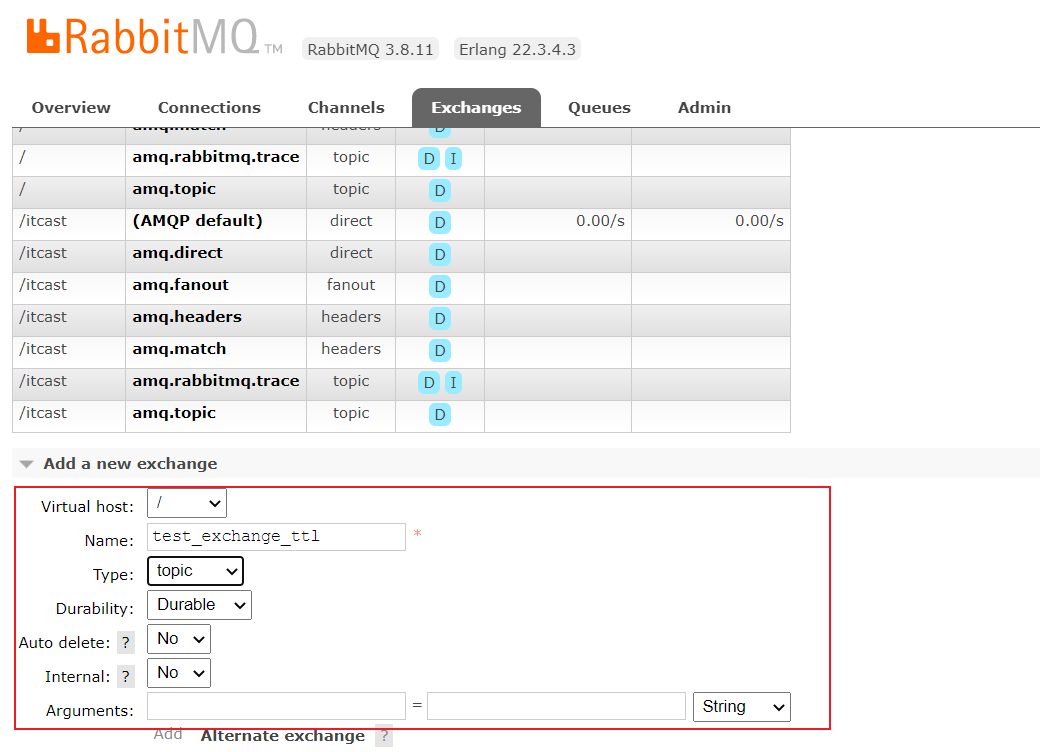
死信队列,英文缩写:DLX
Dead Letter Exchange(死信交换机)
当消息成为Dead message后,可以被重新发送到另一个交换机,这个交换机就是DLX
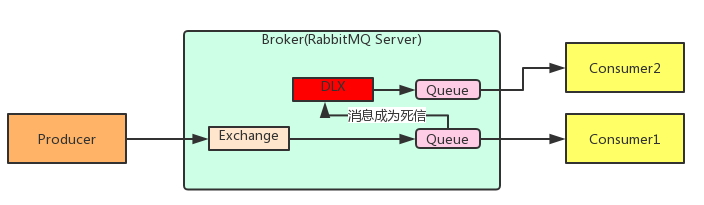
消息成为死信的三种情况:
代码实现
src/main/resources/spring-rabbitmq-producer.xml
1
2
3
4
5
6
7
8
9
10
11
12
13
14
15
16
17
18
19
20
21
22
23
24
25
26
27
28
29
30
31
32
33
34
35
36
37
38
39
40
41
42
43
44
45
46
47
|
<rabbit:queue name="test_queue_dlx" id="test_queue_dlx">
<rabbit:queue-arguments>
<entry key="x-dead-letter-exchange" value="exchange_dlx" />
<entry key="x-dead-letter-routing-key" value="dlx.hehe" />
<entry key="x-message-ttl" value="10000" value-type="java.lang.Integer" />
<entry key="x-max-length" value="10" value-type="java.lang.Integer" />
</rabbit:queue-arguments>
</rabbit:queue>
<rabbit:topic-exchange name="test_exchange_dlx">
<rabbit:bindings>
<rabbit:binding pattern="test.dlx.#" queue="test_queue_dlx"></rabbit:binding>
</rabbit:bindings>
</rabbit:topic-exchange>
<rabbit:queue name="queue_dlx" id="queue_dlx"></rabbit:queue>
<rabbit:topic-exchange name="exchange_dlx">
<rabbit:bindings>
<rabbit:binding pattern="dlx.#" queue="queue_dlx"></rabbit:binding>
</rabbit:bindings>
</rabbit:topic-exchange>
|
src/test/java/com/itheima/test/ProducerTest.java
1
2
3
4
5
6
7
8
9
10
11
12
13
14
15
16
17
18
19
20
21
22
|
@Test
public void testDlx(){
rabbitTemplate.convertAndSend("test_exchange_dlx","test.dlx.haha","我是一条消息,我会死吗?");
}
|
消费者
src/main/resources/spring-rabbitmq-consumer.xml
1
2
3
4
5
|
<rabbit:listener-container connection-factory="connectionFactory" acknowledge="manual" prefetch="1" >
<rabbit:listener ref="dlxListener" queue-names="test_queue_dlx"></rabbit:listener>
</rabbit:listener-container>
|
src/main/java/com/itheima/listener/DlxListener.java
1
2
3
4
5
6
7
8
9
10
11
12
13
14
15
16
17
18
19
20
21
22
23
24
| @Component
public class DlxListener implements ChannelAwareMessageListener {
@Override
public void onMessage(Message message, Channel channel) throws Exception {
long deliveryTag = message.getMessageProperties().getDeliveryTag();
try {
System.out.println(new String(message.getBody()));
System.out.println("处理业务逻辑...");
int i = 3/0;
channel.basicAck(deliveryTag,true);
} catch (Exception e) {
System.out.println("出现异常,拒绝接受");
channel.basicNack(deliveryTag,true,false);
}
}
}
|
由此可见:
- 死信交换机和死信队列和普通的没有区别
- 当消息成为死信后,如果该队列绑定了死信交换机,则消息会被死信交换机重新路由到死信队列
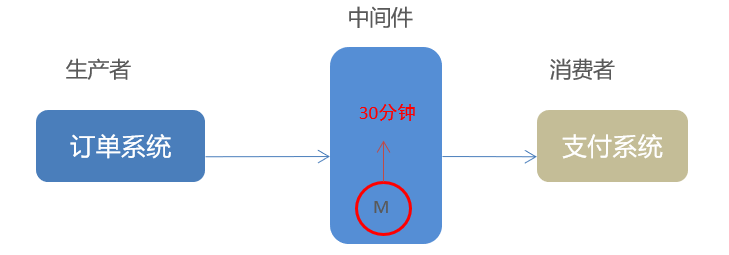
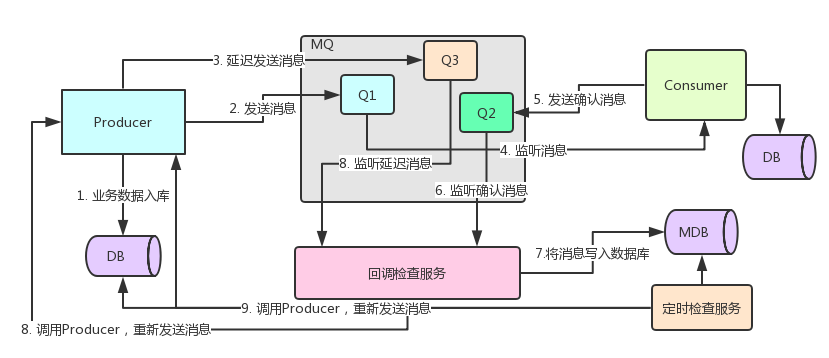
延迟队列
延迟队列,即消息进入队列后不会立即被消费,只有到达指定时间后,才会被消费。
如需求:1)下单后,30分钟未支付,取消订单,回滚库存。2) 新用户注册成功7天后,发送短信问候。
实现方式:

很可惜,在RabbitMQ中并未提供延迟队列功能。
但是可以使用:==TTL+死信队列== 组合实现延迟队列的效果。。
代码实现
src/main/resources/spring-rabbitmq-producer.xml
1
2
3
4
5
6
7
8
9
10
11
12
13
14
15
16
17
18
19
20
21
22
23
24
25
26
27
28
29
30
31
|
<rabbit:queue id="order_queue" name="order_queue">
<rabbit:queue-arguments>
<entry key="x-dead-letter-exchange" value="order_exchange_dlx" />
<entry key="x-dead-letter-routing-key" value="dlx.order.cancel" />
<entry key="x-message-ttl" value="10000" value-type="java.lang.Integer" />
</rabbit:queue-arguments>
</rabbit:queue>
<rabbit:topic-exchange name="order_exchange">
<rabbit:bindings>
<rabbit:binding pattern="order.#" queue="order_queue"></rabbit:binding>
</rabbit:bindings>
</rabbit:topic-exchange>
<rabbit:queue id="order_queue_dlx" name="order_queue_dlx"></rabbit:queue>
<rabbit:topic-exchange name="order_exchange_dlx">
<rabbit:bindings>
<rabbit:binding pattern="dlx.order.#" queue="order_queue_dlx"></rabbit:binding>
</rabbit:bindings>
</rabbit:topic-exchange>
|
src/test/java/com/itheima/test/ProducerTest.java
1
2
3
4
5
6
7
8
9
10
11
12
13
14
| @Test
public void testDelay() throws InterruptedException {
rabbitTemplate.convertAndSend("order_exchange","order.msg","订单信息:id=1,time=2019年8月17日16:41:47");
}
|
消费者
src/main/resources/spring-rabbitmq-consumer.xml
1
2
3
4
| <rabbit:listener-container connection-factory="connectionFactory" acknowledge="manual" prefetch="1" >
<rabbit:listener ref="orderListener" queue-names="order_queue_dlx"></rabbit:listener>
</rabbit:listener-container>
|
src/main/java/com/itheima/listener/OrderListener.java
1
2
3
4
5
6
7
8
9
10
11
12
13
14
15
16
17
18
19
20
21
22
23
24
25
| @Component
public class OrderListener implements ChannelAwareMessageListener {
@Override
public void onMessage(Message message, Channel channel) throws Exception {
long deliveryTag = message.getMessageProperties().getDeliveryTag();
try {
System.out.println(new String(message.getBody()));
System.out.println("处理业务逻辑...");
System.out.println("根据订单id查询其状态...");
System.out.println("判断状态是否为支付成功");
System.out.println("取消订单,回滚库存....");
channel.basicAck(deliveryTag,true);
} catch (Exception e) {
System.out.println("出现异常,拒绝接受");
channel.basicNack(deliveryTag,true,false);
}
}
}
|
日志与监控
日志
rabbitmqctl管理和监控
1
2
3
4
5
6
7
8
9
10
11
12
13
14
15
16
17
18
19
20
21
22
23
24
25
26
27
28
29
30
| 查看如何使用
# rabbitmqctl help
查看队列
# rabbitmqctl list_queues
查看exchanges
# rabbitmqctl list_exchanges
查看用户
# rabbitmqctl list_users
查看连接
# rabbitmqctl list_connections
查看消费者信息
# rabbitmqctl list_consumers
查看环境变量
# rabbitmqctl environment
查看未被确认的队列
# rabbitmqctl list_queues name messages_unacknowledged
查看单个队列的内存使用
# rabbitmqctl list_queues name memory
查看准备就绪的队列
# rabbitmqctl list_queues name messages_ready
|
消息可靠性分析与追踪
在使用任何消息中间件的过程中,难免会出现某条消息异常丢失的情况。对于RabbitMQ而言,可能是因为生产者或消费者与RabbitMQ断开了连接,而它们与RabbitMQ又采用了不同的确认机制;也有可能是因为交换器与队列之间不同的转发策略;甚至是交换器并没有与任何队列进行绑定,生产者又不感知或者没有采取相应的措施;另外RabbitMQ本身的集群策略也可能导致消息的丢失。这个时候就需要有一个较好的机制跟踪记录消息的投递过程,以此协助开发和运维人员进行问题的定位。
在RabbitMQ中可以使用Firehose和rabbitmq_tracing插件功能来实现消息追踪。
消息追踪-Firehose
- firehose的机制是将生产者投递给rabbitmq的消息,rabbitmq投递给消费者的消息按照指定的格式发送到默认的exchange上。这个默认的exchange的名称为amq.rabbitmq.trace,它是一个topic类型的exchange。发送到这个exchange上的消息的routing key为 publish.exchangename 和 deliver.queuename。其中exchangename和queuename为实际exchange和queue的名称,分别对应生产者投递到exchange的消息,和消费者从queue上获取的消息。
注意:打开 trace 会影响消息写入功能,适当打开后请关闭。
1
2
3
4
5
| rabbitmqctl trace_on:
# 开启Firehose命令
rabbitmqctl trace_off:
#关闭Firehose命令
|
消息追踪-rabbitmq_tracing插件
使用rabbitmq_tracing插件功能来实现消息追踪
1
2
| rabbitmq-plugins enable rabbitmq_tracing
# 开启插件
|
RabbitMQ 应用问题
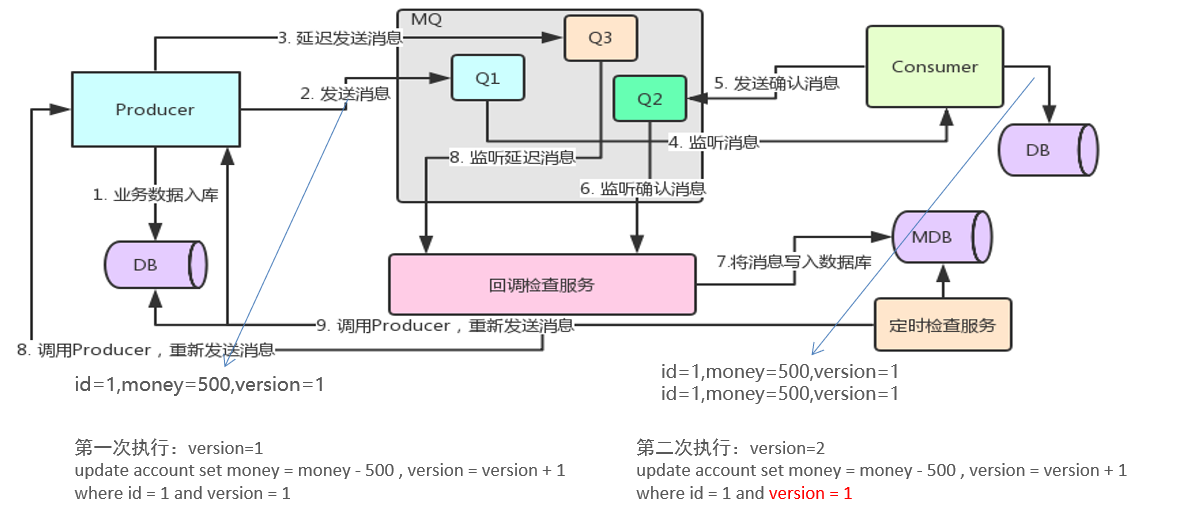
消息可靠性保障
消息补偿机制
需求:100%确保消息发送成功
消息幂等性保障
乐观锁解决方案