环境:
第一个SSM整合项目
已上传GitHub:https://github.com/MCContinuing/SSMBuild
数据库设计
创建一个存放书籍数据的数据库表
1
2
3
4
5
6
7
8
9
10
11
12
13
14
15
16
17
18
| CREATE DATABASE `ssmbuild`;
USE `ssmbuild`;
DROP TABLE IF EXISTS `books`;
CREATE TABLE `books` (
`bookID` INT(10) NOT NULL AUTO_INCREMENT COMMENT '书id',
`bookName` VARCHAR(100) NOT NULL COMMENT '书名',
`bookCounts` INT(11) NOT NULL COMMENT '数量',
`detail` VARCHAR(200) NOT NULL COMMENT '描述',
KEY `bookID` (`bookID`)
) ENGINE=INNODB DEFAULT CHARSET=utf8
INSERT INTO `books`(`bookID`,`bookName`,`bookCounts`,`detail`)VALUES
(1,'Java',1,'从入门到放弃'),
(2,'MySQL',10,'从删库到跑路'),
(3,'Linux',5,'从进门到进牢');
|
基本环境搭建
项目依赖配置
pom.xml
1
2
3
4
5
6
7
8
9
10
11
12
13
14
15
16
17
18
19
20
21
22
23
24
25
26
27
28
29
30
31
32
33
34
35
36
37
38
39
40
41
42
43
44
45
46
47
48
49
50
51
52
53
54
55
56
57
58
59
60
61
62
63
64
65
66
67
68
69
70
71
72
73
74
75
76
77
78
79
80
81
82
83
84
85
86
87
88
89
90
91
92
93
94
95
96
97
98
99
100
101
102
| <?xml version="1.0" encoding="UTF-8"?>
<project xmlns="http://maven.apache.org/POM/4.0.0"
xmlns:xsi="http://www.w3.org/2001/XMLSchema-instance"
xsi:schemaLocation="http://maven.apache.org/POM/4.0.0 http://maven.apache.org/xsd/maven-4.0.0.xsd">
<modelVersion>4.0.0</modelVersion>
<groupId>com.mc</groupId>
<artifactId>SSMBuild</artifactId>
<version>1.0-SNAPSHOT</version>
<dependencies>
<dependency>
<groupId>junit</groupId>
<artifactId>junit</artifactId>
<version>4.12</version>
</dependency>
<dependency>
<groupId>mysql</groupId>
<artifactId>mysql-connector-java</artifactId>
<version>5.1.47</version>
</dependency>
<dependency>
<groupId>javax.servlet</groupId>
<artifactId>servlet-api</artifactId>
<version>2.5</version>
</dependency>
<dependency>
<groupId>javax.servlet</groupId>
<artifactId>jsp-api</artifactId>
<version>2.0</version>
</dependency>
<dependency>
<groupId>javax.servlet</groupId>
<artifactId>jstl</artifactId>
<version>1.2</version>
</dependency>
<dependency>
<groupId>org.mybatis</groupId>
<artifactId>mybatis</artifactId>
<version>3.5.2</version>
</dependency>
<dependency>
<groupId>org.mybatis</groupId>
<artifactId>mybatis-spring</artifactId>
<version>2.0.2</version>
</dependency>
<dependency>
<groupId>org.springframework</groupId>
<artifactId>spring-webmvc</artifactId>
<version>5.1.10.RELEASE</version>
</dependency>
<dependency>
<groupId>org.springframework</groupId>
<artifactId>spring-jdbc</artifactId>
<version>5.1.10.RELEASE</version>
</dependency>
<dependency>
<groupId>org.projectlombok</groupId>
<artifactId>lombok</artifactId>
<version>1.18.10</version>
</dependency>
</dependencies>
<build>
<resources>
<resource>
<directory>src/main/java</directory>
<includes>
<include>**/*.properties</include>
<include>**/*.xml</include>
</includes>
<filtering>false</filtering>
</resource>
<resource>
<directory>src/main/resources</directory>
<includes>
<include>**/*.properties</include>
<include>**/*.xml</include>
</includes>
<filtering>false</filtering>
</resource>
</resources>
</build>
</project>
|
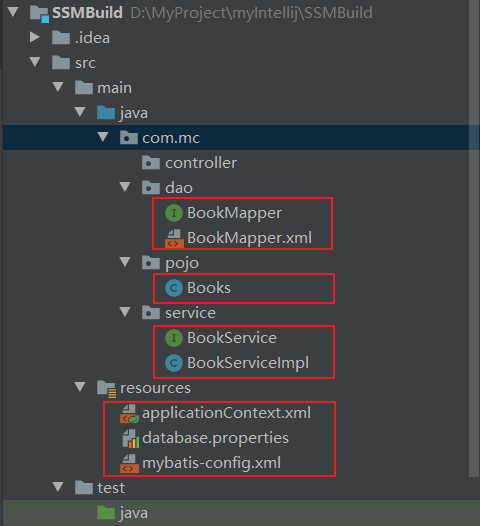
建立基本结构和配置框架!
com.kuang.pojo
com.kuang.dao
com.kuang.service
com.kuang.controller
mybatis-config.xml
1
2
3
4
5
6
7
| <?xml version="1.0" encoding="UTF-8" ?>
<!DOCTYPE configuration
PUBLIC "-//mybatis.org//DTD Config 3.0//EN"
"http://mybatis.org/dtd/mybatis-3-config.dtd">
<configuration>
</configuration>
|
applicationContext.xml
1
2
3
4
5
6
7
| <?xml version="1.0" encoding="UTF-8"?>
<beans xmlns="http://www.springframework.org/schema/beans"
xmlns:xsi="http://www.w3.org/2001/XMLSchema-instance"
xsi:schemaLocation="http://www.springframework.org/schema/beans
http://www.springframework.org/schema/beans/spring-beans.xsd">
</beans>
|
整合Mybatis层
1、数据库配置文件 database.properties
1
2
3
4
| jdbc.driver=com.mysql.jdbc.Driver
jdbc.url=jdbc:mysql://localhost:3306/ssmbuild?useSSL=true&useUnicode=true&characterEncoding=utf8&serverTimezone=Asia/Shanghai
jdbc.username=root
jdbc.password=admin
|
2、IDEA关联数据库
3、编写MyBatis的核心配置文件
1
2
3
4
5
6
7
8
9
10
11
12
13
14
| <?xml version="1.0" encoding="UTF-8" ?>
<!DOCTYPE configuration
PUBLIC "-//mybatis.org//DTD Config 3.0//EN"
"http://mybatis.org/dtd/mybatis-3-config.dtd">
<configuration>
<typeAliases>
<package name="com.kuang.pojo"/>
</typeAliases>
<mappers>
<mapper resource="com/mc/dao/BookMapper.xml"/>
</mappers>
</configuration>
|
4、编写数据库对应的实体类 com.kuang.pojo.Books
使用lombok插件!
1
2
3
4
5
6
7
8
9
10
11
12
13
14
15
16
17
| package com.mc.pojo;
import lombok.AllArgsConstructor;
import lombok.Data;
import lombok.NoArgsConstructor;
@Data
@AllArgsConstructor
@NoArgsConstructor
public class Books {
private int bookID;
private String bookName;
private int bookCounts;
private String detail;
}
|
5、编写Dao层的 Mapper接口!
1
2
3
4
5
6
7
8
9
10
11
12
13
14
15
16
17
18
19
20
21
22
23
| package com.mc.dao;
import com.mc.pojo.Books;
import java.util.List;
public interface BookMapper {
int addBook(Books book);
int deleteBookById(int id);
int updateBook(Books books);
Books queryBookById(int id);
List<Books> queryAllBook();
}
|
6、编写接口对应的 Mapper.xml 文件。需要导入MyBatis的包;
1
2
3
4
5
6
7
8
9
10
11
12
13
14
15
16
17
18
19
20
21
22
23
24
25
26
27
28
29
30
31
32
33
34
35
36
37
| <?xml version="1.0" encoding="UTF-8" ?>
<!DOCTYPE mapper
PUBLIC "-//mybatis.org//DTD Mapper 3.0//EN"
"http://mybatis.org/dtd/mybatis-3-mapper.dtd">
<mapper namespace="com.mc.dao.BookMapper">
<insert id="addBook" parameterType="Books">
insert into ssmbuild.books(bookName,bookCounts,detail)
values (#{bookName}, #{bookCounts}, #{detail})
</insert>
<delete id="deleteBookById" parameterType="int">
delete from ssmbuild.books where bookID=#{bookID}
</delete>
<update id="updateBook" parameterType="Books">
update ssmbuild.books
set bookName = #{bookName},bookCounts = #{bookCounts},detail = #{detail}
where bookID = #{bookID}
</update>
<select id="queryBookById" resultType="Books">
select * from ssmbuild.books
where bookID = #{bookID}
</select>
<select id="queryAllBook" resultType="Books">
SELECT * from ssmbuild.books
</select>
</mapper>
|
7、编写Service层的接口和实现类
接口:
1
2
3
4
5
6
7
8
9
10
11
12
13
14
15
16
17
18
19
| package com.mc.service;
import com.mc.pojo.Books;
import java.util.List;
public interface BookService {
int addBook(Books book);
int deleteBookById(int id);
int updateBook(Books books);
Books queryBookById(int id);
List<Books> queryAllBook();
}
|
实现类:
1
2
3
4
5
6
7
8
9
10
11
12
13
14
15
16
17
18
19
20
21
22
23
24
25
26
27
28
29
30
31
32
33
34
35
| package com.mc.service;
import com.mc.dao.BookMapper;
import com.mc.pojo.Books;
import java.util.List;
public class BookServiceImpl implements BookService {
private BookMapper bookMapper;
public void setBookMapper(BookMapper bookMapper) {
this.bookMapper = bookMapper;
}
public int addBook(Books book) {
return bookMapper.addBook(book);
}
public int deleteBookById(int id) {
return bookMapper.deleteBookById(id);
}
public int updateBook(Books books) {
return bookMapper.updateBook(books);
}
public Books queryBookById(int id) {
return bookMapper.queryBookById(id);
}
public List<Books> queryAllBook() {
return bookMapper.queryAllBook();
}
}
|
OK,到此,底层需求操作编写完毕!
整合Spring层
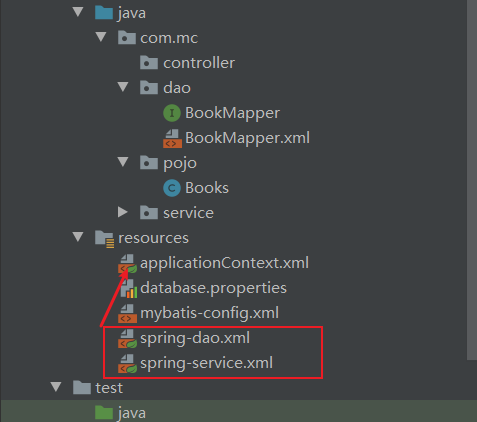
1、配置Spring整合MyBatis,我们这里数据源使用c3p0连接池;
2、我们去编写Spring整合Mybatis的相关的配置文件;spring-dao.xml
1
2
3
4
5
6
7
8
9
10
11
12
13
14
15
16
17
18
19
20
21
22
23
24
25
26
27
28
29
30
31
32
33
34
35
36
37
38
39
40
41
42
43
44
45
46
47
48
49
50
| <?xml version="1.0" encoding="UTF-8"?>
<beans xmlns="http://www.springframework.org/schema/beans"
xmlns:xsi="http://www.w3.org/2001/XMLSchema-instance"
xmlns:context="http://www.springframework.org/schema/context"
xsi:schemaLocation="http://www.springframework.org/schema/beans
http://www.springframework.org/schema/beans/spring-beans.xsd
http://www.springframework.org/schema/context
https://www.springframework.org/schema/context/spring-context.xsd">
<context:property-placeholder location="classpath:database.properties"/>
<bean id="dataSource" class="org.springframework.jdbc.datasource.DriverManagerDataSource">
<property name="driverClassName" value="com.mysql.jdbc.Driver"/>
<property name="url" value="jdbc:mysql://localhost:3306/mybatis?useSSL=true&useUnicode=true&characterEncoding=utf8"/>
<property name="username" value="root"/>
<property name="password" value="admin"/>
</bean>
<bean id="sqlSessionFactory" class="org.mybatis.spring.SqlSessionFactoryBean">
<property name="dataSource" ref="dataSource"/>
<property name="configLocation" value="classpath:mybatis-config.xml"/>
</bean>
<bean class="org.mybatis.spring.mapper.MapperScannerConfigurer">
<property name="sqlSessionFactoryBeanName" value="sqlSessionFactory"/>
<property name="basePackage" value="com.mc.dao"/>
</bean>
</beans>
|
3、Spring整合service层
1
2
3
4
5
6
7
8
9
10
11
12
13
14
15
16
17
18
19
20
21
22
23
24
| <?xml version="1.0" encoding="UTF-8"?>
<beans xmlns="http://www.springframework.org/schema/beans"
xmlns:xsi="http://www.w3.org/2001/XMLSchema-instance"
xmlns:context="http://www.springframework.org/schema/context"
xsi:schemaLocation="http://www.springframework.org/schema/beans
http://www.springframework.org/schema/beans/spring-beans.xsd
http://www.springframework.org/schema/context
http://www.springframework.org/schema/context/spring-context.xsd">
<context:component-scan base-package="com.mc.service" />
<bean id="BookServiceImpl" class="com.mc.service.BookServiceImpl">
<property name="bookMapper" ref="bookMapper"/>
</bean>
<bean id="transactionManager" class="org.springframework.jdbc.datasource.DataSourceTransactionManager">
<property name="dataSource" ref="dataSource" />
</bean>
</beans>
|
Spring层搞定!再次理解一下,Spring就是一个大杂烩,一个容器!对吧!
整合SpringMVC
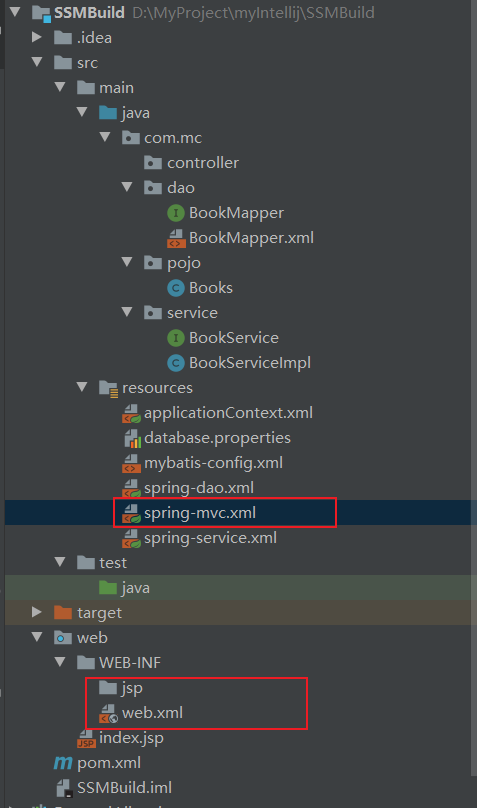
首先让项目支持Web
1、web.xml
1
2
3
4
5
6
7
8
9
10
11
12
13
14
15
16
17
18
19
20
21
22
23
24
25
26
27
28
29
30
31
32
33
34
35
36
37
38
39
40
41
42
43
44
| <?xml version="1.0" encoding="UTF-8"?>
<web-app xmlns="http://xmlns.jcp.org/xml/ns/javaee"
xmlns:xsi="http://www.w3.org/2001/XMLSchema-instance"
xsi:schemaLocation="http://xmlns.jcp.org/xml/ns/javaee http://xmlns.jcp.org/xml/ns/javaee/web-app_4_0.xsd"
version="4.0">
<servlet>
<servlet-name>DispatcherServlet</servlet-name>
<servlet-class>org.springframework.web.servlet.DispatcherServlet</servlet-class>
<init-param>
<param-name>contextConfigLocation</param-name>
<param-value>classpath:applicationContext.xml</param-value>
</init-param>
<load-on-startup>1</load-on-startup>
</servlet>
<servlet-mapping>
<servlet-name>DispatcherServlet</servlet-name>
<url-pattern>/</url-pattern>
</servlet-mapping>
<filter>
<filter-name>encodingFilter</filter-name>
<filter-class>
org.springframework.web.filter.CharacterEncodingFilter
</filter-class>
<init-param>
<param-name>encoding</param-name>
<param-value>utf-8</param-value>
</init-param>
</filter>
<filter-mapping>
<filter-name>encodingFilter</filter-name>
<url-pattern>/*</url-pattern>
</filter-mapping>
<session-config>
<session-timeout>15</session-timeout>
</session-config>
</web-app>
|
2、spring-mvc.xml
1
2
3
4
5
6
7
8
9
10
11
12
13
14
15
16
17
18
19
20
21
22
23
24
25
26
27
28
29
| <?xml version="1.0" encoding="UTF-8"?>
<beans xmlns="http://www.springframework.org/schema/beans"
xmlns:xsi="http://www.w3.org/2001/XMLSchema-instance"
xmlns:context="http://www.springframework.org/schema/context"
xmlns:mvc="http://www.springframework.org/schema/mvc"
xsi:schemaLocation="http://www.springframework.org/schema/beans
http://www.springframework.org/schema/beans/spring-beans.xsd
http://www.springframework.org/schema/context
http://www.springframework.org/schema/context/spring-context.xsd
http://www.springframework.org/schema/mvc
https://www.springframework.org/schema/mvc/spring-mvc.xsd">
<mvc:annotation-driven />
<mvc:default-servlet-handler/>
<bean class="org.springframework.web.servlet.view.InternalResourceViewResolver">
<property name="viewClass" value="org.springframework.web.servlet.view.JstlView" />
<property name="prefix" value="/WEB-INF/jsp/" />
<property name="suffix" value=".jsp" />
</bean>
<context:component-scan base-package="com.kuang.controller" />
</beans>
|
3、Spring配置整合文件,applicationContext.xml
1
2
3
4
5
6
7
8
9
10
11
| <?xml version="1.0" encoding="UTF-8"?>
<beans xmlns="http://www.springframework.org/schema/beans"
xmlns:xsi="http://www.w3.org/2001/XMLSchema-instance"
xsi:schemaLocation="http://www.springframework.org/schema/beans
http://www.springframework.org/schema/beans/spring-beans.xsd">
<import resource="spring-dao.xml"/>
<import resource="spring-service.xml"/>
<import resource="spring-mvc.xml"/>
</beans>
|
配置结束!!
业务功能编写
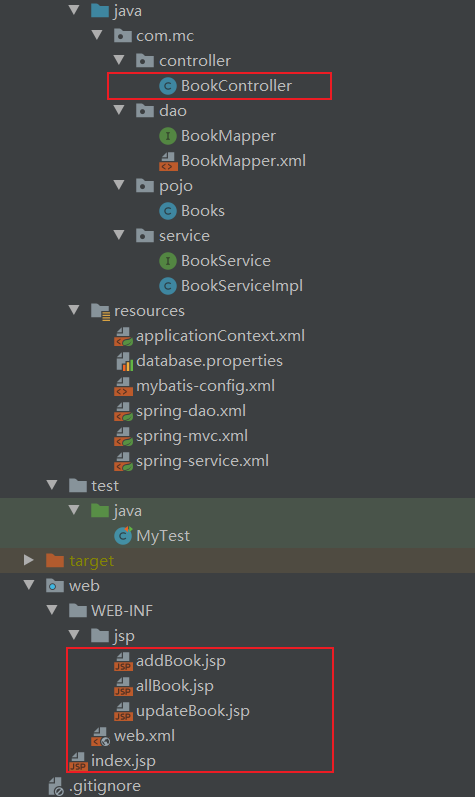
1、BookController 类编写 , 方法一:查询全部书籍
1
2
3
4
5
6
7
8
9
10
11
12
13
14
15
| @Controller
@RequestMapping("/book")
public class BookController {
@Autowired
@Qualifier("BookServiceImpl")
private BookService bookService;
@RequestMapping("/allBook")
public String list(Model model) {
List<Books> list = bookService.queryAllBook();
model.addAttribute("list", list);
return "allBook";
}
}
|
2、编写首页 index.jsp
1
2
3
4
5
6
7
8
9
10
11
12
13
14
15
16
17
18
19
20
21
22
23
24
25
26
27
28
29
| <%@ page language="java" contentType="text/html; charset=UTF-8" pageEncoding="UTF-8" %>
<!DOCTYPE HTML>
<html>
<head>
<title>首页</title>
<style type="text/css">
a {
text-decoration: none;
color: black;
font-size: 18px;
}
h3 {
width: 180px;
height: 38px;
margin: 100px auto;
text-align: center;
line-height: 38px;
background: deepskyblue;
border-radius: 4px;
}
</style>
</head>
<body>
<h3>
<a href="${pageContext.request.contextPath}/book/allBook">点击进入列表页</a>
</h3>
</body>
</html>
|
3、书籍列表页面 allbook.jsp
1
2
3
4
5
6
7
8
9
10
11
12
13
14
15
16
17
18
19
20
21
22
23
24
25
26
27
28
29
30
31
32
33
34
35
36
37
38
39
40
41
42
43
44
45
46
47
48
49
50
51
52
53
54
55
56
57
58
59
60
| <%@ taglib prefix="c" uri="http://java.sun.com/jsp/jstl/core" %>
<%@ page contentType="text/html;charset=UTF-8" language="java" %>
<html>
<head>
<title>书籍列表</title>
<meta name="viewport" content="width=device-width, initial-scale=1.0">
<link href="https://cdn.bootcss.com/bootstrap/3.3.7/css/bootstrap.min.css" rel="stylesheet">
</head>
<body>
<div class="container">
<div class="row clearfix">
<div class="col-md-12 column">
<div class="page-header">
<h1>
<small>书籍列表 —— 显示所有书籍</small>
</h1>
</div>
</div>
</div>
<div class="row">
<div class="col-md-4 column">
<a class="btn btn-primary" href="${pageContext.request.contextPath}/book/toAddBook">新增</a>
</div>
</div>
<div class="row clearfix">
<div class="col-md-12 column">
<table class="table table-hover table-striped">
<thead>
<tr>
<th>书籍编号</th>
<th>书籍名字</th>
<th>书籍数量</th>
<th>书籍详情</th>
<th>操作</th>
</tr>
</thead>
<tbody>
<c:forEach var="book" items="${requestScope.get('list')}">
<tr>
<td>${book.getBookID()}</td>
<td>${book.getBookName()}</td>
<td>${book.getBookCounts()}</td>
<td>${book.getDetail()}</td>
<td>
<a href="${pageContext.request.contextPath}/book/toUpdateBook?id=${book.getBookID()}">更改</a> |
<a href="${pageContext.request.contextPath}/book/del/${book.getBookID()}">删除</a>
</td>
</tr>
</c:forEach>
</tbody>
</table>
</div>
</div>
</div>
|
4、BookController 类编写 , 方法二:添加书籍
1
2
3
4
5
6
7
8
9
10
11
| @RequestMapping("/toAddBook")
public String toAddPaper() {
return "addBook";
}
@RequestMapping("/addBook")
public String addPaper(Books books) {
System.out.println(books);
bookService.addBook(books);
return "redirect:/book/allBook";
}
|
5、添加书籍页面:addBook.jsp
1
2
3
4
5
6
7
8
9
10
11
12
13
14
15
16
17
18
19
20
21
22
23
24
25
26
27
28
29
30
| <%@ taglib prefix="c" uri="http://java.sun.com/jsp/jstl/core" %>
<%@ page contentType="text/html;charset=UTF-8" language="java" %>
<html>
<head>
<title>新增书籍</title>
<meta name="viewport" content="width=device-width, initial-scale=1.0">
<!-- 引入 Bootstrap -->
<link href="https://cdn.bootcss.com/bootstrap/3.3.7/css/bootstrap.min.css" rel="stylesheet">
</head>
<body>
<div class="container">
<div class="row clearfix">
<div class="col-md-12 column">
<div class="page-header">
<h1>
<small>新增书籍</small>
</h1>
</div>
</div>
</div>
<form action="${pageContext.request.contextPath}/book/addBook" method="post">
书籍名称:<input type="text" name="bookName"><br><br><br>
书籍数量:<input type="text" name="bookCounts"><br><br><br>
书籍详情:<input type="text" name="detail"><br><br><br>
<input type="submit" value="添加">
</form>
</div>
|
6、BookController 类编写 , 方法三:修改书籍
1
2
3
4
5
6
7
8
9
10
11
12
13
14
15
16
| @RequestMapping("/toUpdateBook")
public String toUpdateBook(Model model, int id) {
Books books = bookService.queryBookById(id);
System.out.println(books);
model.addAttribute("book",books );
return "updateBook";
}
@RequestMapping("/updateBook")
public String updateBook(Model model, Books book) {
System.out.println(book);
bookService.updateBook(book);
Books books = bookService.queryBookById(book.getBookID());
model.addAttribute("books", books);
return "redirect:/book/allBook";
}
|
7、修改书籍页面 updateBook.jsp
1
2
3
4
5
6
7
8
9
10
11
12
13
14
15
16
17
18
19
20
21
22
23
24
25
26
27
28
29
30
31
| <%@ taglib prefix="c" uri="http://java.sun.com/jsp/jstl/core" %>
<%@ page contentType="text/html;charset=UTF-8" language="java" %>
<html>
<head>
<title>修改信息</title>
<meta name="viewport" content="width=device-width, initial-scale=1.0">
<link href="https://cdn.bootcss.com/bootstrap/3.3.7/css/bootstrap.min.css" rel="stylesheet">
</head>
<body>
<div class="container">
<div class="row clearfix">
<div class="col-md-12 column">
<div class="page-header">
<h1>
<small>修改信息</small>
</h1>
</div>
</div>
</div>
<form action="${pageContext.request.contextPath}/book/updateBook" method="post">
<input type="hidden" name="bookID" value="${book.getBookID()}"/>
书籍名称:<input type="text" name="bookName" value="${book.getBookName()}"/>
书籍数量:<input type="text" name="bookCounts" value="${book.getBookCounts()}"/>
书籍详情:<input type="text" name="detail" value="${book.getDetail() }"/>
<input type="submit" value="提交"/>
</form>
</div>
|
8、BookController 类编写 , 方法四:删除书籍
1
2
3
4
5
| @RequestMapping("/del/{bookId}")
public String deleteBook(@PathVariable("bookId") int id) {
bookService.deleteBookById(id);
return "redirect:/book/allBook";
}
|
MVC拦截器
SpringMVC的处理器拦截器类似于Servlet开发中的过滤器Filter,用于对处理器进行预处理和后处理。开发者可以自己定义一些拦截器来实现特定的功能。
过滤器与拦截器的区别:拦截器是AOP思想的具体应用。
过滤器
- servlet规范中的一部分,任何java web工程都可以使用
- 在url-pattern中配置了/*之后,可以对所有要访问的资源进行拦截
拦截器
- 拦截器是SpringMVC框架自己的,只有使用了SpringMVC框架的工程才能使用
- 拦截器只会拦截访问的控制器方法, 如果访问的是jsp/html/css/image/js是不会进行拦截的
自定义拦截器
那如何实现拦截器呢?
想要自定义拦截器,必须实现 HandlerInterceptor 接口。
1、新建一个Moudule , springmvc-07-Interceptor , 添加web支持
2、配置web.xml 和 springmvc-servlet.xml 文件
3、编写一个拦截器
1
2
3
4
5
6
7
8
9
10
11
12
13
14
15
16
17
18
19
20
21
22
23
24
25
26
27
28
| package com.kuang.interceptor;
import org.springframework.web.servlet.HandlerInterceptor;
import org.springframework.web.servlet.ModelAndView;
import javax.servlet.http.HttpServletRequest;
import javax.servlet.http.HttpServletResponse;
public class MyInterceptor implements HandlerInterceptor {
public boolean preHandle(HttpServletRequest httpServletRequest, HttpServletResponse httpServletResponse, Object o) throws Exception {
System.out.println("------------处理前------------");
return true;
}
public void postHandle(HttpServletRequest httpServletRequest, HttpServletResponse httpServletResponse, Object o, ModelAndView modelAndView) throws Exception {
System.out.println("------------处理后------------");
}
public void afterCompletion(HttpServletRequest httpServletRequest, HttpServletResponse httpServletResponse, Object o, Exception e) throws Exception {
System.out.println("------------清理------------");
}
}
|
4、在springmvc的配置文件中配置拦截器
1
2
3
4
5
6
7
8
9
10
11
|
<mvc:interceptors>
<mvc:interceptor>
<mvc:mapping path="/**"/>
<bean class="com.kuang.interceptor.MyInterceptor"/>
</mvc:interceptor>
</mvc:interceptors>
|
5、编写一个Controller,接收请求
1
2
3
4
5
6
7
8
9
10
11
12
13
14
15
16
17
| package com.kuang.controller;
import org.springframework.stereotype.Controller;
import org.springframework.web.bind.annotation.RequestMapping;
import org.springframework.web.bind.annotation.ResponseBody;
@Controller
public class InterceptorController {
@RequestMapping("/interceptor")
@ResponseBody
public String testFunction() {
System.out.println("控制器中的方法执行了");
return "hello";
}
}
|
6、前端 index.jsp
1
| <a href="${pageContext.request.contextPath}/interceptor">拦截器测试</a>
|
7、启动tomcat 测试一下!
验证用户是否登录 (认证用户)
实现思路
1、有一个登陆页面,需要写一个controller访问页面。
2、登陆页面有一提交表单的动作。需要在controller中处理。判断用户名密码是否正确。如果正确,向session中写入用户信息。返回登陆成功。
3、拦截用户请求,判断用户是否登陆。如果用户已经登陆。放行, 如果用户未登陆,跳转到登陆页面
测试:
1、编写一个登陆页面 login.jsp
1
2
3
4
5
6
7
8
9
10
11
12
13
14
15
16
17
| <%@ page contentType="text/html;charset=UTF-8" language="java" %>
<html>
<head>
<title>Title</title>
</head>
<h1>登录页面</h1>
<hr>
<body>
<form action="${pageContext.request.contextPath}/user/login">
用户名:<input type="text" name="username"> <br>
密码:<input type="password" name="pwd"> <br>
<input type="submit" value="提交">
</form>
</body>
</html>
|
2、编写一个Controller处理请求
1
2
3
4
5
6
7
8
9
10
11
12
13
14
15
16
17
18
19
20
21
22
23
24
25
26
27
28
29
30
31
32
33
34
35
36
37
38
39
40
| package com.kuang.controller;
import org.springframework.stereotype.Controller;
import org.springframework.web.bind.annotation.RequestMapping;
import javax.servlet.http.HttpSession;
@Controller
@RequestMapping("/user")
public class UserController {
@RequestMapping("/jumplogin")
public String jumpLogin() throws Exception {
return "login";
}
@RequestMapping("/jumpSuccess")
public String jumpSuccess() throws Exception {
return "success";
}
@RequestMapping("/login")
public String login(HttpSession session, String username, String pwd) throws Exception {
System.out.println("接收前端==="+username);
session.setAttribute("user", username);
return "success";
}
@RequestMapping("logout")
public String logout(HttpSession session) throws Exception {
session.invalidate();
return "login";
}
}
|
3、编写一个登陆成功的页面 success.jsp
1
2
3
4
5
6
7
8
9
10
11
12
13
14
| <%@ page contentType="text/html;charset=UTF-8" language="java" %>
<html>
<head>
<title>Title</title>
</head>
<body>
<h1>登录成功页面</h1>
<hr>
${user}
<a href="${pageContext.request.contextPath}/user/logout">注销</a>
</body>
</html>
|
4、在 index 页面上测试跳转!启动Tomcat 测试,未登录也可以进入主页!
1
2
3
4
5
6
7
8
9
10
11
12
13
| <%@ page contentType="text/html;charset=UTF-8" language="java" %>
<html>
<head>
<title>$Title$</title>
</head>
<body>
<h1>首页</h1>
<hr>
<%--登录--%>
<a href="${pageContext.request.contextPath}/user/jumplogin">登录</a>
<a href="${pageContext.request.contextPath}/user/jumpSuccess">成功页面</a>
</body>
</html>
|
5、编写用户登录拦截器
1
2
3
4
5
6
7
8
9
10
11
12
13
14
15
16
17
18
19
20
21
22
23
24
25
26
27
28
29
30
31
32
33
34
35
36
37
38
39
40
| package com.kuang.interceptor;
import org.springframework.web.servlet.HandlerInterceptor;
import org.springframework.web.servlet.ModelAndView;
import javax.servlet.ServletException;
import javax.servlet.http.HttpServletRequest;
import javax.servlet.http.HttpServletResponse;
import javax.servlet.http.HttpSession;
import java.io.IOException;
public class LoginInterceptor implements HandlerInterceptor {
public boolean preHandle(HttpServletRequest request, HttpServletResponse response, Object handler) throws ServletException, IOException {
System.out.println("uri: " + request.getRequestURI());
if (request.getRequestURI().contains("login")) {
return true;
}
HttpSession session = request.getSession();
if(session.getAttribute("user") != null) {
return true;
}
request.getRequestDispatcher("/WEB-INF/jsp/login.jsp").forward(request, response);
return false;
}
public void postHandle(HttpServletRequest httpServletRequest, HttpServletResponse httpServletResponse, Object o, ModelAndView modelAndView) throws Exception {
}
public void afterCompletion(HttpServletRequest httpServletRequest, HttpServletResponse httpServletResponse, Object o, Exception e) throws Exception {
}
}
|
6、在Springmvc的配置文件中注册拦截器
1
2
3
4
5
6
7
|
<mvc:interceptors>
<mvc:interceptor>
<mvc:mapping path="/**"/>
<bean id="loginInterceptor" class="com.kuang.interceptor.LoginInterceptor"/>
</mvc:interceptor>
</mvc:interceptors>
|
7、再次重启Tomcat测试!
OK,测试登录拦截功能无误.
文件上传下载
文件上传是项目开发中最常见的功能之一 ,springMVC 可以很好的支持文件上传,但是SpringMVC上下文中默认没有装配MultipartResolver,因此默认情况下其不能处理文件上传工作。如果想使用Spring的文件上传功能,则需要在上下文中配置MultipartResolver。
前端表单要求:为了能上传文件,必须将表单的method设置为POST,并将enctype设置为multipart/form-data。只有在这样的情况下,浏览器才会把用户选择的文件以二进制数据发送给服务器;
对表单中的 enctype 属性做个详细的说明:
- application/x-www=form-urlencoded:默认方式,只处理表单域中的 value 属性值,采用这种编码方式的表单会将表单域中的值处理成 URL 编码方式。
- multipart/form-data:这种编码方式会以二进制流的方式来处理表单数据,这种编码方式会把文件域指定文件的内容也封装到请求参数中,不会对字符编码。
- text/plain:除了把空格转换为 “+” 号外,其他字符都不做编码处理,这种方式适用直接通过表单发送邮件。
1
2
3
4
| <form action="" enctype="multipart/form-data" method="post">
<input type="file" name="file"/>
<input type="submit">
</form>
|
一旦设置了enctype为multipart/form-data,浏览器即会采用二进制流的方式来处理表单数据,而对于文件上传的处理则涉及在服务器端解析原始的HTTP响应。在2003年,Apache Software Foundation发布了开源的Commons FileUpload组件,其很快成为Servlet/JSP程序员上传文件的最佳选择。
- Servlet3.0规范已经提供方法来处理文件上传,但这种上传需要在Servlet中完成。
- 而Spring MVC则提供了更简单的封装。
- Spring MVC为文件上传提供了直接的支持,这种支持是用即插即用的MultipartResolver实现的。
- Spring MVC使用Apache Commons FileUpload技术实现了一个MultipartResolver实现类:
- CommonsMultipartResolver。因此,SpringMVC的文件上传还需要依赖Apache Commons FileUpload的组件。
文件上传
1、导入文件上传的jar包,commons-fileupload , Maven会自动帮我们导入他的依赖包 commons-io包;
1
2
3
4
5
6
7
8
9
10
11
12
|
<dependency>
<groupId>commons-fileupload</groupId>
<artifactId>commons-fileupload</artifactId>
<version>1.3.3</version>
</dependency>
<dependency>
<groupId>javax.servlet</groupId>
<artifactId>javax.servlet-api</artifactId>
<version>4.0.1</version>
</dependency>
|
2、配置bean:multipartResolver
【注意!!!这个bena的id必须为:multipartResolver , 否则上传文件会报400的错误!在这里栽过坑,教训!】
1
2
3
4
5
6
7
8
|
<bean id="multipartResolver" class="org.springframework.web.multipart.commons.CommonsMultipartResolver">
<property name="defaultEncoding" value="utf-8"/>
<property name="maxUploadSize" value="10485760"/>
<property name="maxInMemorySize" value="40960"/>
</bean>
|
CommonsMultipartFile 的 常用方法:
String getOriginalFilename():获取上传文件的原名
InputStream getInputStream():获取文件流
void transferTo(File dest):将上传文件保存到一个目录文件中
我们去实际测试一下
3、编写前端页面
1
2
3
4
| <form action="/upload" enctype="multipart/form-data" method="post">
<input type="file" name="file"/>
<input type="submit" value="upload">
</form>
|
4、Controller
1
2
3
4
5
6
7
8
9
10
11
12
13
14
15
16
17
18
19
20
21
22
23
24
25
26
27
28
29
30
31
32
33
34
35
36
37
38
39
40
41
42
43
44
45
46
47
48
49
50
| package com.kuang.controller;
import org.springframework.stereotype.Controller;
import org.springframework.web.bind.annotation.RequestMapping;
import org.springframework.web.bind.annotation.RequestParam;
import org.springframework.web.multipart.commons.CommonsMultipartFile;
import javax.servlet.http.HttpServletRequest;
import java.io.*;
@Controller
public class FileController {
@RequestMapping("/upload")
public String fileUpload(@RequestParam("file") CommonsMultipartFile file , HttpServletRequest request) throws IOException {
String uploadFileName = file.getOriginalFilename();
if ("".equals(uploadFileName)){
return "redirect:/index.jsp";
}
System.out.println("上传文件名 : "+uploadFileName);
String path = request.getServletContext().getRealPath("/upload");
File realPath = new File(path);
if (!realPath.exists()){
realPath.mkdir();
}
System.out.println("上传文件保存地址:"+realPath);
InputStream is = file.getInputStream();
OutputStream os = new FileOutputStream(new File(realPath,uploadFileName));
int len=0;
byte[] buffer = new byte[1024];
while ((len=is.read(buffer))!=-1){
os.write(buffer,0,len);
os.flush();
}
os.close();
is.close();
return "redirect:/index.jsp";
}
}
|
5、测试上传文件,OK!
采用file.Transto 来保存上传的文件
1、编写Controller
1
2
3
4
5
6
7
8
9
10
11
12
13
14
15
16
17
18
19
20
|
@RequestMapping("/upload2")
public String fileUpload2(@RequestParam("file") CommonsMultipartFile file, HttpServletRequest request) throws IOException {
String path = request.getServletContext().getRealPath("/upload");
File realPath = new File(path);
if (!realPath.exists()){
realPath.mkdir();
}
System.out.println("上传文件保存地址:"+realPath);
file.transferTo(new File(realPath +"/"+ file.getOriginalFilename()));
return "redirect:/index.jsp";
}
|
2、前端表单提交地址修改
3、访问提交测试,OK!
文件下载
文件下载步骤:
1、设置 response 响应头
2、读取文件 – InputStream
3、写出文件 – OutputStream
4、执行操作
5、关闭流 (先开后关)
代码实现:
1
2
3
4
5
6
7
8
9
10
11
12
13
14
15
16
17
18
19
20
21
22
23
24
25
26
27
28
29
30
31
| @RequestMapping(value="/download")
public String downloads(HttpServletResponse response ,HttpServletRequest request) throws Exception{
String path = request.getServletContext().getRealPath("/upload");
String fileName = "基础语法.jpg";
response.reset();
response.setCharacterEncoding("UTF-8");
response.setContentType("multipart/form-data");
response.setHeader("Content-Disposition",
"attachment;fileName="+URLEncoder.encode(fileName, "UTF-8"));
File file = new File(path,fileName);
InputStream input=new FileInputStream(file);
OutputStream out = response.getOutputStream();
byte[] buff =new byte[1024];
int index=0;
while((index= input.read(buff))!= -1){
out.write(buff, 0, index);
out.flush();
}
out.close();
input.close();
return null;
}
|
前端
1
| <a href="/download">点击下载</a>
|
测试,文件下载OK,大家可以和我们之前学习的JavaWeb原生的方式对比一下,就可以知道这个便捷多了!